


JHB
Tutorials
or
A Miscellany of Aeronautical Ramblings
as you wish
Index
Click on an item to take you to the thread..
|
Planning |
Systems |
Procedures (ATC) |
Procedures (Flight Crew) |
|
|
Instrument Approach Procedures |
Q. When planning a flight to BIKF (Keflavik) the only "near" alternate is BIRK which is only 20 miles away, so I would imagine that the chances are that if BIKF is closed BIRK is also closed. Therefore when flying to remote airports do I factor in enough fuel to get back again, and plan on landing with a heavy a/c if the original destination is okay?
A. A good question Phil but the answer isn't that straightforward these days.
It is more than likely that most airlines would indeed nominate BIRK as the alternate airfield. This is economics overriding safety again but the basic logic is sound. Most flights will indeed land at BIKF without having to divert. Of the diverted aircraft a high proportion would probably land at BIRK - only a very small percentage would have to go elsewhere.
If all these aircraft had nominated a diversion airfield back in Canada or Europe the fuel load required would be huge and this would have a possible impact on payload and definitely on performance. With BIRK as the alternate airfield the fuel load would be substantially less. The effect of this is a change in planning considerations by the crew.
The crew will have a good idea of the forecast weather in Iceland before they depart. If the situation suggests that both airfields are likely to be affected then the crew will be looking to see how long the weather is likely to affect the region. In other words their priority is to look at the TAF's rather than the METAR's - something we tend not to do in FS. They will therefore alter their fuel plan depending on the TAF data. Choice one is to add enough fuel to ensure a return to the mainland. Choice two would be to uplift additional fuel sufficient to hold and await weather improvement. Choice three would be to delay the flight.
I think a lot of pilots would opt for choice 2 and uplift additional fuel. The amount would depend on the pilot and his experience of Icelandic weather. Say he elects to add fuel for a further hour. This would allow him to reach BIKF and hold for 01:45 before diverting to BIRK with experience telling him that the weather may well clear in that time. Alternatively, whilst en route and keeping up to date with the weather situation, the pilot could fly for another 30 minutes towards Iceland before reaching a point at which he must turn around and head back to Europe. Effectively this would be the PNR (Point of No Return) because the reduced fuel carried would dictate this should be calculated.
PNR may be calculated in the FMS but if not it's not too difficult a formula to work out. A good web page for this is http://www.airsafaris.com.au/general_info/pnrcp.htm as it tells you about PNR and also about Critical Point. Critical Point isn't a fuel derived calculation but a simpler formula to tell you if it is quicker to go on than to turn back. I used it for all overwater flights (even from EGNS to EGGP) and it made me feel good to know that if I hit a problem on the way I always knew whether it was best to turn round or carry on.
Transition Altitude and Transition Level
This is easy enough to explain but a diagram would help you visualise it better. Being lazy I tried a Google search for an existing one but it surprised me that I couldn't find anything decent. I'll try a written explanation but it would be better to go back to basics so you understand how this has evolved.
Transition Altitude is the published height at which pilots change from QNH to 1013.2mb. Below this height they use QNH and their altimeters give them the correct reading AMSL. This is sensible as it gives them a correct indication as to their height relative to any nearby obstructions or high ground as these are always shown on charts AMSL. QNH is therefore essential as the prime altimeter setting when aircraft are getting close to the ground.
The problem is that QNH varies - we only have to tap our barometer to see this. As high and low pressure systems cross the UK the QNH can change a lot - I've seen it as high as 1040mb and as low as 949mb. Now if you have a deep low pressure system crossing the UK the QNH can vary significantly between two airports and this is where it starts getting tricky.
Say you have a QNH at Belfast of 998mb and a QNH at London of 981mb. Once an aircraft starts flying from one location to the other his altimeter will no longer be correct in showing his real height above sea level. If they both climb to 5000ft and set course without changing pressure settings:
1. The aircraft going to London will gradually descend in height. Over London the altimeter will still read 5000ft but his actual height will be 4490ft. Basic maths here is 998 - 981 17mb. 1mb is 30ft so 17 x 30 = 510ft
2. The aircraft leaving London will gradually gain height so that over Belfast his real altitude will be 5510ft.
Obviously the correct solution is to have all aircraft in the same geographical area to fly on the same pressure setting. Staying on QNH would involve a lot of changes of settings during the flight above (with the increased chance of human error) so an alternative solution was looked for. This is where flight levels come into the picture.
The thinking was that once aircraft got above a height safe from terrain they could all go onto a standard pressure setting. 1013.2mb was chosen as this is part of the original ICAN definition for the International Standard Atmosphere. The point at which aircraft changed from QNH to SPS was called the Transition Altitude. Keep in mind here that if an aircraft is on QNH both pilot and ATC know exactly its height relative to any high ground. With 1013.2mb set there is no way of measuring the relative height of an aircraft to terrain (except by some rather quick mental arithmetic).
Because aircraft have to stay on QNH to determine their height relative to high ground it was realised that the Transition Altitude would have to vary from country to country. Here in the UK the national TA is 3000ft and so is the Netherlands. Germany, Denmark and Ireland use 5000ft, Spain and Italy use 6000ft. It gets funny though because some countries have TA's totally independent of high ground considerations. Switzerland's TA is 5000ft, Tel Aviv is 10500ft, Cape Town is 7500ft, Australia 10000ft and Japan 14000ft. Note that countries can have localised TA's and the UK is no exception. The London TMA has a TA of 6000ft and this is related to stack levels rather than any high ground issue. See the full listing below.
Having decided on two altimeter settings - effectively one for take off or approach and the other for en route flight - it was realised that descriptions had to become more clear so that potential errors in terminology didn't cause problems. Altitude was therefore only ever to be used when a pilot had the altimeter set on QNH and all pilots and controllers now recognise that the word "altitude" in any R/T call always mean height above sea level. For flight on 1013.2mb the term "Flight Level" was introduced.
The dual system causes a slight problem - how do you separate aircraft around the Transition Altitude when one is on QNH and one on 1013.2mb? This is actually a controller problem because we have to know the lowest safe flight level above the Transition Altitude to drop aircraft to. It obviously has to be at least 1000ft above the TA and we use a little arithmetical formula to determine this. The Transition Level (we now prefer to use Lowest Available Flight Level or LAFL) is the term for the "bottom" flight level, so to speak.
The LAFL varies with pressure and the lower the pressure drops the lower all flight levels get. In the case of Belfast above with the QNH of 981mb the lowest flight level available above 3000ft becomes FL50. You can see a conversion chart similar to what we use here - http://home.online.no/~eisoere/VACCN/Refsheets/TA_TL.html.
In reality Transition Level isn't of great concern to the pilot as it is the approach controller's responsibility to determine. It isn't used a lot either - only when an aircraft is already at 3000ft and you have to descend another aircraft on top of him. I've never had to calculate this in IVAO yet. In fact in IVAO you can drop an aircraft to 4000ft QNH despite it being above the Transition Altitude - this is perfectly acceptable.
Don't forget that the Scottish TMA Transition Altitude is 6000ft and that takes care of the high ground around the major airports up there. In fact the full list of permutations is:
| Aberdeen CTR/CTA |
6000 ft
|
| Belfast CTR/TMA |
6000 ft
|
| Birmingham CTR/CTA |
4000 ft
|
| Cardiff CTR/CTA |
4000 ft
|
| Durham Tees Valley CTR/CTA |
6000 ft
|
| Edinburgh CTR/CTA |
6000 ft
|
| Glasgow CTR |
6000 ft
|
| Leeds Bradford CTR/CTA |
5000 ft
|
| London TMA |
6000 ft
|
| Manchester TMA |
5000 ft
|
| Newcastle CTR/CTA |
6000 ft
|
| East Midlands CTR/CTA |
4000 ft
|
| Scottish TMA |
6000 ft
|
| Solent CTA |
4000 ft
|
| Sumburgh CTR/CTA |
6000 ft
|
Altimeter Setting Regions (ASR's)
When cleared down to any height (whether QNH or a Flight Level) the responsibility for terrain clearance always remains with the controller in the UK. Approach controllers keep an eye on pressure changes as this may result in a change in Transition Level but, in a few rare cases, Centre controllers also have to watch the pressure as it may compromise the bases of some airways over high ground. In these cases they stop allocating the lowest published level to aircraft.
For VFR aircraft there is a slightly different system. For aircraft staying below the Transition Level the variation of QNH is still a problem so the UK is divided up into 21 Altimeter Setting Regions. Once a VFR aircraft leaves controlled airspace ATC will give the aircraft a Regional QNH which is the lowest forecast QNH for the ASR he will be flying in. For example aircraft leaving Ronaldsway going to Liverpool will fly on the EGNS QNH until the zone boundary and will then be given the Holyhead Regional QNH - which he will use until approach the CTR around Liverpool. The ASR's are:
| Skerry (01) | Humber (09) | Shetland (16) |
| Portree (02) | Scillies (10) | Orkney (17) |
| Rattray (03) | Wessex (11) | Marlin (18) |
| Tyne (04) | Chatham (12) | Petrel (19) |
| Belfast (05) | Portland (13) | Skua (20) |
| Holyhead (07) | Yarmouth (14) | Puffin (21) |
| Barnsley (08) | Cotswold (15) |
I rarely use Regional QNH online mainly because we can't easily get hold
of this data. It's easier to find the METAR of an airfield en route and
pass that.
"Can we confirm that if flying toward a 2900ft mountain at 3000ft with 1013Mb set on the Altimeter and we clear the mountain by 100ft, If we perform a wide Orbit whilst re-setting to 1006Mb and then fly at 3000ft I will crash into the mountain approximately 100ft from the summit?"
No - it is exactly the other way round. If you are approaching a 2900ft hill at 3000ft indicated (with the local QNH set) then you will clear the hill by 100ft. If you have 1013.25mb set your altimeter is showing 3000ft but this is indicated rather than actual - you are not truly at 3000ft but actually flying at Flight Level 30. You will have no idea whatsoever what your terrain clearance in this case unless you do the maths. If the local QNH is indeed 1006mb then 7mb x 30 = 210ft so FL30 will actually be 2790ft AMSL and you will hit the hill if 1013.25mb is set.
ASv6 will indeed give you the QNH of the nearest reporting station. In some parts of the world this could be a long way from the mountain so caution is still advised. This is why we have Minimum Sector Altitudes in real life. Add to that the requirement for IFR flight that says your flight planned height must always be a minimum of 1000ft above the highest point within 15nm of your intended track.
FS usually defaults to 1013.2mb unless you use a start up situation that has changed this. This default pressure is world-wide - effectively you have a global QNH of 1013.25mb too. You are right though - pilots not using any weather generator should not set any pressures given by ATC (which is based on current real world pressures) but stay on 1013.2mb. Likewise if pilots have any weather set up within FS2004 itself which is not current real world data then they should also ignore the actual QNH value passed by ATC - but they should hit the B key instead (which sets the local FS2004 QNH).
The only sensible solution is as you suggest. Anyone joining IVAO (whether controller or pilot) should be fed exactly the same weather values so that everyone is on identical weather data. It doesn't necessarily have to be current (although this would be the ultimate goal) but it would put us all in the same ballpark.
"Within the Simulator, does the aircraft change height in relation to the mesh (hills) when the Altimeter Pressure Setting is adjusted?"
If you alter the altimeter in FS (or in real life) what happens is that the sub scale rotates to show the pressure dialled in and the needles rotate to show a changed indicated altitude. Nothing magical happens with the world outside the cockpit - all you are doing is altering your indicated height.
Say you are flogging along at 4000ft with the altimeter set to the QNH of your departure airfield of 1006mb. You call the arrival airfield and they give you a QNH of 1010mb. You put the new value in and this will make the Altimeter wind up to 4120ft. If you are on autopilot the aircraft will obviously descend to maintain 4000ft..
"Does ASv6 automatically set the QNH (available in World/Weather/Customized/Advanced/Temp-Pressure) of the nearest station?"
It shouldn't. If it feeds the QNH into the altimeter automatically then you will never be able to fly on Flight Levels because ASv6 would override this. It should only recognise the local QNH and feed this to the FS register. To set QNH you either do it manually or hit the B key.
"I think I am right to believe that when controlling a busy airfield online one cannot guarantee that all pilots will be flying on the "given" QNH and hence vertical separation remains arbitrary, even though they all may have dialled this into their altimeters."
Again they shouldn't all be on the given QNH - only those using real weather. Pilots not using real weather should leave their altimeters alone. The next bit may sound confusing but it isn't really. The radar shows the indicated altitude being flown by a pilot. This altitude is relative to the values and settings in his FS2004 setup. So, theoretically, a pilot with no real weather flying at 4000ft on 1013.2mb will actually be at 4000ft because FS defaults to this. We will therefore see him at 4000ft. A pilot using real weather will set the local QNH - say 1005mb - and descend to an indicated height of 4000ft. Again this is correct FOR HIS SETUP and his height should also appear on the radar as 4000ft.
I suppose we could test this. Two pilots could connect to IVAO at the same location. Both should have FS default weather set and hit B to calibrate the altimeter. Next, both switch on Slew and jump up to say 8000ft. They should still be at the same height visually and ATC should see them both at this height. Next step is for Pilot 1 to connect to real weather. My guess is that as soon as the pressure value is fed into FS the aircraft will do one of two things:
1. It will stay in the same position relate to Aircraft 2 but the altimeter will radically change. Both Pilot 1 and ATC should see a different indicated height. Resetting the altimeter to the local QNH will correct the indicated height and Pilot 1 and ATC should then see 8000ft as the correct height again. Pilot 2 will have seen absolutely nothing alter.
2. Aircraft 1 will physically jump to a different height because of the pressure change. Aircraft 2 will see this happen. On resetting the altimeter to the correct QNH the aircraft will come back down to the same height as Aircraft 2.
I doubt the second case will happen but it depends on what height value is being sent by FS to the IVAO server. If indicated altitude is in the data packet then Case 1 should apply. If FS is sending height relative to 1013Mb at all times (just like encoding altimeters in the real world) then Case 2 will apply.
Again
Correct
me if I am wrong.
QNH is set from MSL
QFE is set from AGL, i.e. MSL + airfield elevation.
Or is it above transitional level!!.
Correct - but it's better to think the other way round and say "QNH is sea level pressure so when I set this on my altimeter it will show my height AMSL". If you set the airfield QFE (which is airfield pressure) then, obviously, the altimeter will read zero when you are on the runway. We've tended to stop using QFE these days because it doesn't give you height AMSL and therefore it can't be used for terrain clearance (unless your charts show obstacle heights above aerodrome level as well as AMSL).
"Samos 09 app 3000ft, there is a ridge of 2000-2550. ActiveSky gave me QNH 1019, low cloud 2000-4000 base, top 6000-7000 BE58T altimeter registered 29.92. I just cleared the ridge, with my gear up warning chirruping at me! I was at 3000ft indicated!"
No you were not! If you had 29.92" set on the altimeter your were at Flight Level 30 and not 3000ft. Your real height would have been 2820ft AMSL. You should have set the QNH of 1019 (or the equivalent in inches).
"To set airfield zero, Peter wound down his altimeter (EGBJ 95ft), and mine went down to MINUS 190ft. I assume that I was on the FS default QNH, and Peter was on the VATSIM QNH. A difference of MSL and AGL!+ VATSIM Confusing."
Too many possible factors here. If Peter zeroed his altimeter at EGBJ then he would have got the QFE reading but only as applicable to his current weather and his airfield scenery. If you had different weather or different scenery with an airfield height AMSL at variance with Peter's then you would indeed get a different height on your altimeter.
Just a quick recap on weights.
Empty Weight - (EW or AEW) self explanatory but this is a measured value for each aircraft. It includes everything bar the loadable weights. On some aircraft it even includes unusable fuel weight and oil.
Maximum All Up Weight (MAUW) is the certified maximum weight for flight. You cannot exceed this without implications on structural integrity. Often called MTOW (Maximum Take Off Weight).
Maximum Ramp Weight (MRW) is the same as above but will include the extra fuel for taxy. MRW - taxy fuel MAUW.
Maximum Zero Fuel Weight (MZFW) is the maximum weight an aircraft can carry before any fuel is loaded. Effectively it is Empty Weight plus Payload. So, the max payload that can ever be carried is MZFW - EW.
Maximum Landing Weight (MLW) is the weight at which the aircraft has got to be down to before a landing can be made. Exceeding MLW means greater stress on the landing gear. This is one reason why you hear of aircraft having to circle around for a long time to dump fuel before making a landing. It is quite a low figure.
The
usual calculation method is the start off with Empty weight and add your
payload. If this is above MZFW you have to shed load.
Next you add your fuel weight to get your Gross Weight. This must be below
MRW. Take away your taxi fuel and the resultant figure has to be below
MAUW.
If things are OK to this point you then work out your sector fuel burn and subtract this weight from the Gross Weight to get actual landing weight. Obviously this has to be below the MLW figure and if it isn't you have to shed either fuel or payload..
I'd like to suggest a slightly different procedure here. Because you have two options for directional control it's best to make full use of both. HDG mode is more flexible in that you can easily alter your heading as you fly but if CRS/NAV mode is selected and you are tracking a radial then you can't touch NAV1 at all (except the standby frequency).
Let's use you original EGPD SAB NEW route for this example.
On departure tune NAV1 into the first en route beacon (SAB, not ADN) and set up the correct radial (about 185 at a guess) in the CRS/NAV box. You should be able to get this value from FSNav or your flight plan - and you should keep this figure in your head. Set the standby frequency to the second point en route (NEW). At the same time set the HDG value to runway heading.
On
take off engage AP in HDG and ALT modes so the aircraft initially flies
runway heading and begins a climb to the first assigned level. Stay on
runway heading until you have got gear up and cleaned up the flaps - it's
not unusual to fly out to around 2/3nm before turning on track. The exception
here is when flying a SID but any SID's that require turns within 4nm
should be left alone until you get more familiar with the aircraft and
your reactions are faster. If you are happy to start turning before you
have completed the flap sequence then alter the HDG value to match the
track you memorised - 185 in this case. This will put you roughly on course
to SAB
whilst leaving you free to complete the after take off checks.
Once the aircraft is tidy you can now concentrate on your navigation. The autopilot will be pointing you in the right direction now (in HDG mode) but a glance at the HSI may show you that you are slightly left or right of the 185 radial between ADN and SAB. Alter course on the HDG bug to fly an intercept for the right track and once you are on a closing heading for the radial switch the A/P from HDG to NAV mode and let it capture and fly the radial.
The point I must make here is that routes along airways and for instrument approach procedures are not rigid - they are guidelines for flying. You don't have to get neurotic and fly the exact path shown on the plates because then you would be spending too much time navigating rather than on aircraft handling. An aircraft flying from Aberdeen to SAB would never take off and turn back to the ADN beacon before setting course for SAB - he would just turn direct to SAB and gradually intercept the ADN - SAB radial. Same with turning from one VOR to another - you don't fly directly over the beacon very often. As one Trident pilot remarked on flying the dogleg route from Jersey to SAM to MID - "If we flew north until we hit SAM and then turned right to MID we would end up 8nm north of the airway."
As you track towards SAB take a look at your actual heading as this will give you a rough idea of any drift. Set this value in the HDG window as you will need it. As you approach to within about 7nm of SAB VOR switch over to HDG mode to free up the NAV selector. Switch NAV1 over to NEW frequency (flip the frequencies if you use a radio with a standby option) and dial up the new (sic) course in the CRS/NAV selector (166). At the same time dial up the next en route point frequency in the standby frequency box.
You are now flying on HDG mode towards SAB VOR and your display will no longer be showing you the radial to SAB because you have reset it to NEW. It doesn't matter that you have lost course guidance because you are hardly likely to diverge much from your original track in the few miles to run to the VOR. If you set the HDG value to the heading shown on the HSI at the time you disconnected the NAV mode you will still pass within half a mile of the beacon. However this is immaterial because now you are looking at the HSI to lock on to the next radial to NEW VOR.
It is most likely that the needle will start off at full deflection but as you get near to the beacon it will come alive and start moving towards the centre. As soon as you see the needle moving you can re-engage NAV/CRS mode and let the autopilot capture the new radial. And so it goes on...
You should never stay on NAV mode right up to a VOR. If you remain on NAV mode you will find that the aircraft will start to hunt the needle as you get close because the signal is getting more sensitive. With just a little drift the aircraft may start a mild left and right bank to capture the centreline but this will become more severe as you get closer. It is always better to jump to HDG mode approaching any VOR.
Regarding a question about no autopilot function for NAV2
Not your fault. The autopilot in FS will only track Nav 1 on most aircraft - there is no switch to make it track Nav2. It makes Nav 2 a bit redundant except if you want to get a cross bearing.
There's a little trick though which may be worth passing on. Tune the first beacon (let's use SAB again) into Nav 1 and get the autopilot to track to this. Tune Nav 2 to the next beacon (NEW) on your route at the same time so this is already set up. Normally I would then fly towards SAB and when about 5nm away I would check Nav2, make sure the needle is centred (by altering the OBS knob) and then read off the radial to the beacon. Next I would dial this into the HDG mode of the autopilot and switch from CRS to HDG activation. The aircraft will now be on a heading for NEW VOR.
You can now, at your leisure, change Nav 1 to NEW VOR because the autopilot is no longer being controlled by it. Dial the frequency up, centre the needle again and now you can switch the autopilot back to CRS mode and let it take you to the VOR. Nav2 is now free to set up the next beacon en route..
If you do this then life becomes a bit easier. If, as happened to you, ATC give you clearance to route direct to the next point you can quickly set this up in Nav2, centre the needle and then bang the radial into the autopilot HDG mode. It puts you on the new course quite quickly and you can take your time in sorting the boxes out.
Sometimes I don't engage CRS mode but simply fly the autopilot in HDG mode for a route - alternating from NAV1 to Nav2 as I go.
Commenting on the very strong stick force that needs to be overcome after applying full power for a go-around after an abortive full flap approach..
Your first instinct after application of full power produces the sharp pitch up is to push hard with the one free hand, but then you find just how much muscle power is needed. You can use both hands to alleviate the aching wrist but it then dawns that some sort of corrective action is needed. Retrimming is the sensible option but a few lamented pilots have tried raising flaps. Either way it hits home that both options require you to take one hand off the controls..
Later C172's had the Max Flap setting limited to 30 rather than the original 40 to give pilots a better chance.
The PA28 is far more forgiving in the full flap overshoot because it has a much smaller flap area than the C172. I've flown a good few other aircraft types but I can't remember what they were like - probably because I never took them into a go around with full flap and trim set for the approach.
The only aircraft that I flew with big stick forces in the course of normal flight was the Aztec C. On this aircraft when the flaps were lowered you need a huge forward pressure on the stick. If you waited a while to let the airspeed drop it was slightly better but you generally don't have the time to do this. Clever pilots used to wind a bit of forward trim on first before dropping flaps.
The
Aztec F didn't have this problem because Piper built an interlink between
the flaps and the tailplane. As you lowered the flaps the
tailplane incidence also altered to compensate - very clever.
I once had the trim runaway on me in the Aztec. This can happen with aircraft that have an electric trim button on the yoke and it shorts out. You have to act fast and pull the circuit breaker because you just don't have the muscle power to overcome full nose up or nose down trim - it is beyond anyone's physical strength to contain it. In my case it was pitching up so I put the aircraft into a steep turn whilst looking for the breaker. If left straight and level the aircraft would have pitched up into a stall. By going into a steep turn the aircraft would have just turned steeper and a stall would have been delayed a few seconds.
A pitch down runaway trim is the real nightmare because you don't have any alternative action to take. The aircraft will be pitching down, increasing speed (through VNE in a few seconds) and losing height very rapidly. The only option here is to find the breaker very, very quickly. You could chop the throttles but this won't buy you much extra time.
Instrument Approach Procedures
One thing we rarely did in PCI as controllers was stick an aircraft in the hold or clear an aircraft for a procedural approach. A procedural approach is one where the radar has failed (or the airfield doesn't have radar) and the approach is flown from the published IAP plate.
Some of you may have looked at these plates before and may be curious about them. I am currently describing these to Mike so that he can attempt these procedures but I'd like to know if other pilots are interested in going up a level in flying skills.
The basic skills required are in flying holding patterns and in flying the IAP. For holds the knowledge required is;
a) Learning the hold entry procedures to establish correctly onto the holding axis,
b) flying a four or six minute hold to ensure the inbound track is correctly achieved and the timing is correct,
c) learning how to adjust the hold for wind.
The IAP training would involve;
a) a knowledge of the published IAP diagrams and annotations,
b)
Correct interpretation of the flight profile - courses and descent
points,
c) Knowledge of DH/MDH and MAP and Approach Minima procedures.
These are procedures that can be extremely satisfying to fly but it requires good flying skills, a stopwatch, loads of enthusiasm and a fair bit of time. The procedures take some time to learn and reasonable skills to complete - not everyone has the mental agility to comprehend them.
If anyone would like to join in with Mike I will be happy to provide assistance. I can't teach you how to fly these procedures but I can describe them to you and watch you on IVAO to explain corrective action.
I won't create a tutorial on this subject as there are bound to be plenty already on the Internet. What I will do is dig out some sites where the data is lucid and has plenty of diagrams and I can then field your questions as you go through the material.
Squawks in IVAO are more critical than in PCI. VFR squawks like 1200, 2000 and 7000 change the way an aircraft appears on radar as does selecting standby, Mode C (or On) and Ident. Before you connect to IVAO make sure you change your transponder to the correct setting. These are:
7000
for VFR flight in the UK
2000 for VFR flight in Europe
1200 for VFR flight in USA
For an IFR flight make sure than 2000 is selected before you connect. This is now the universal code for aircraft on stands.
FS defaults to 1200 on start up so make a habit of changing the squawk as soon as you get started and run through your COM/NAV checklist. If you aren't using a checklist yet I suggest it is fast becoming a good idea for online work.
It is quite easy to overload any aircraft and only close inspection of the load sheet will confirm this.
In truth there isn't any great penalty for overloading an aircraft if you know what you are doing. I once flew a PA28 that was 500lb overweight (I don't really recommend this) - a huge amount considering its normal payload was only 750lb. The extra weight increased stall speeds by about 10kts so it was necessary to factor much higher take off and approach speeds. The only other consideration was an extremely gentle landing so that the gear didn't suffer any great landing stresses. Wing spar loading was something I was worried about as all the extra weight was in the fuselage but as it was the Chief Engineer that was with me (and had loaded up the aircraft) I assumed he knew more about this than I did. He did say that full fuel was necessary to keep weight distribution sensible and that people who put in minimum fuel to counter more cabin weight were actually making things worse.
Worse than being overweight is getting the aircraft out of its CG range. In the case above the weight was even across the aircraft (I had a long metal bar actually resting on the top of the panel and running the length of the cabin) and the CG was right in the middle of the operational range. Getting the CG too far forward is tricky in most aircraft (except an ATP) and this isn't too critical unless you run out of control response. Getting the CG aft of max limit is much more dangerous because you not only lose control effectiveness but you can end up with the Centre of Pressure being near or forward of the wing's aerodynamic centre and this will result in severe pitch instability (dynamic instability).
With airliners the situation is different because factors become more critical. Pitch stability and pitch trim are far more sensitive in airliners because most are designed with extremely small tailplane/elevator area. This is done to improve cruise speeds but the downside is that the aircraft cannot be trimmed by elevator alone as with most light aircraft. Instead the whole tailplane is used for trimming and correct settings are essential. If the tailplane is not set at the correct trim angle then the aircraft will simply fail to take off - or pitch up into a stall. In a light aircraft a mistrimmed aircraft just results in having to heave harder but in an airliner it is beyond the crew's power to overcome it.
There are one or two aircraft in FS that mimic trim correctly but it is generally too easy to take off with the wrong settings. If we had proper force feedback and a stick that was bolted to the desk we could find out just how hard it can be to pull the stick back against a mis trim force - but that will never happen..
Systems based FS aircraft are truly getting towards the complexity of the real aircraft and take off and landing can be heavy on workload with just yourself in charge - and seeing the whole cockpit on one small monitor. One armed paperhanger flashes across my mind.
If you sat in a real aircraft it would take about a minute or two to adjust to the spread of the real dials and panels in a true 360 degree, 3D environment but then you would very quickly realise just how accessible all the knobs and taps are. In FS you can't reproduce this - if you want the various panels to look good you have to resort to popups - and this slows your performance down quite a bit.
Let's take the example of running through a checklist. On the PMDG aircraft your first session is likely to be a tortuous affair because you will spend a fair bit of time just looking for the dials or switches in the first place. No problem there - we all have to learn. As the aircraft becomes more familiar and you get accustomed to the hydraulics section or the electrical section you evolve to the point where you can run through the checklist without having to pull up the tutorial showing the mapping of all the gauges. You are beginning to learn the system by heart - in a way. What do I mean by this?
OK - let's look at the physical behaviour of an FS pilot versus a real one. Both of you are sitting comfortably with checklist in hand. Yep - if you want to fly these aircraft I really suggest you print out the checklists and use these instead of an on screen copy. The latter just slows things down again.
Anyone familiar with real aircraft systems checks will know that the checklist doesn't flow nicely from one panel to the next. You may have an electrical item on one line and a flight deck switch on the next line and then a hydraulic item next. In a real aircraft you don't really notice this. OK your eyes are dancing around from panel to panel but it really is a matter of going flick, flick, flick. In FS it can be much more difficult - and a lot slower.
Possibly the best example of this was the superb Shorts 360 panel designed for FS98. The panel was made from Shorts drawings and I believe was actually used by them for cockpit familiarisation. The result was all the aircraft panels faithfully reproduced in FS - which needed about 7 pop ups. It was magnificent - but I couldn't use it to faithfully mimic real aircraft operation. It just took too long to navigate around. Pre take off wasn't too bad because you can take you time over this but once airborne you don't have this luxury - time is a valuable commodity.
A similar example was the superb PA31 default aircraft in Flight Unlimited 3. The cockpit was in complete and true detail but, again, it was so slow to access the various panels that I found it exasperating to use. Something that took only a second or so in the real aircraft (say the approach when you turn fuel pumps on, landing lights on and check temps and pressures) would need three popups in the sim and you just can't do this if you are just about to capture the ILS and the popups block the RMI!
The answer to this conundrum is complex but Gerry has asked the question and I think his approach has merit. First is the aircraft design itself and if any team is making a proper job of a systems aircraft they should pay as much attention to the operation of their panels as to the design. It is no longer a valid procedure just to design all the panels in true realistic finish with working knobs and taps - they have to be useable too. This is beyond our own scope except that I would suggest that if you buy a panel you can't use well then swallow your pride and dump it in favour of one you are happier with.
Next stage is familiarity. I've gone through this before so I won't start again but a complex panel needs you to thoroughly at home with it to get the best out of both. Spend a lot of time with the aircraft so, like real world pilots, you settle down with it. I don't necessarily say forget all the other aircraft in your inventory but if you do like switching aircraft don't have too many complex ones on your system - maybe just one jet and one turboprop. Don't forget that in the real world it is rare for a pilot to be given two aircraft ratings on his license concurrently - normally the most recent one annuls all previous ratings.
Third make it easy on yourself and print out the checklists.
Now onto the fourth point that Gerry makes. If you set up a Wide view system I think it quite feasible to run a two crew operation - if this itself is feasible. Co-opting a second crew member might prove difficult or require some suitable recompense but if volunteers could be found it may prove a very interesting exercise to see if FS can be so manipulated. Obviously items like the GoFlight units increase versatility a lot in this scenario.
Another option which crosses my mind is possibly using the Co Pilot software. Now I'm not all that clued up about this product but, if my grey matter has got it right, I think it is a voice activated tool that allows cockpit drills to be carried out by an invisible CO pilot simply by calling out the checklist. Each identified command is repeated back by the invisible figure. Now whether this software can be taken beyond simple cockpits and applied to the PMDG panels or not I can't say - but it might be worth investigation. Obviously it's not suitable for those of us who talk out aloud as a simple observation like "we're going to dive into the deck at this rate." may possibly misconstrued by the software as a death wish. However, if this software is programmable, it certainly could ease up the workload quite a lot on complex aircraft. Has anyone looked at it? Does it work in an on line environment?
Speed management is the real key to flying jets. For most of the flight you can ease the workload by letting the autothrottle do all the work - a luxury if you are moving up from turboprops or pistons.
The only thing to remember is that the autothrottle no longer disconnects automatically when you turn off the autopilot (it used to in FS98). You have to manually disconnect it by using the mouse or by pressing CTRL + R (you can also arm the autothrottle by pressing SHIFT + R).
The speeds I am going to quote assume you have set the airspeed indicator to operate in IAS mode rather than TAS.
Before take off dial up a speed of 250kts on the panel. After you get airborne you can then engage the autothrottle and let it manage the speed for you. Once you get above FL100 increase the speed to 300kts - this is good for a cruise climb but not all aircraft will manage this - some may settle down around 280kts.
Despite setting 300kts the aircraft will actually be flying faster and faster as you go higher. As the air gets thinner the ASI will under-read more and more. To stop overspeeding the trick is to switch the speed setting from kts to Mach No as you climb. As you climb above 31,000 ft (if you are going that high) keep an eye on the ASI - especially the Mach No value. This will steadily increase as you go higher and when it reaches Mach 0.76 switch the speed display over to Mach Number. The aircraft will now continue to climb at Mach 0.76. Once you have reached your cruising level you can set the Mach cruise speed for the aircraft (usually between Mach 0.82 and Mach 0.86). The ASI will still be reading somewhere in the 250 - 300 kt region during this time but you can ignore this.
Descent is the tricky bit as you need to think ahead quite a bit. Plan well ahead - if you are at FL300 you should be starting down at least 100nm from your destination. The "proper" way to descend is the reverse of the climb but in FS you could get away with switching direct to an IAS descent. Just check your current indicated airspeed. If it is over 300kts then dial up 300kts for the descent but if it is less than 300kts then dial in 250kts. You can now leave the speed alone for the whole of the descent down to FL100. Ignore the fact that some aircraft are so clean that they won't reduce to these speeds even with the throttles fully shut - this is why you start your descent earlier rather than later. Getting too high and too fast is something that happens in real life too.
Once you are down to FL100 you should be planning your initial approach procedures. Again it helps to get speeds back early to slow things down and increase thinking time and here I can use a good real life example of the Heathrow procedures. Inbound from the north you will be routed HON WCO BNN and if you are lucky you will be cleared to BNN at FL70 (bottom of the stack so no holding..).
At WCO you should reduce speed to 210kts. BNN is the holding stack for Heathrow and it is important to get the speed back to 210kts BEFORE you reach this point. This is the maximum allowed speed for any holding pattern. Once you are cleared from BNN towards the ILS (and usually cleared down from FL70 to 3000ft) reduce speed to 180kts. You will probably need to lower flaps for this so check the flap schedule for your aircraft - on some it may be Flap 10 but some will be Flap 15. You can stay at 180kts until you start to intercept the ILS.
Once the ILS is active you reduce speed to your approach speed. Again check the aircraft you are flying but with flaps at 20 or 25 you should be around 150kts for the early 737's, 160kts for the later 737's and about 170kts for a 747. This is off the top of my head so don't quote me on these figures - they may be slightly less. In real life we would work out the exact approach speed depending on the weight of the aircraft and you can do this in FS too - but you should work this out during your pre flight planning and not after you get airborne! It is rather critical in real life because the approach speed can vary greatly from an empty aircraft to a full one. If you try landing an empty aircraft at full weight speeds you'll end up far too fast and will float a good way down the runway.
You can let the autothrottle manage your airspeed on the ILS down to the point at which you normally switch off the autopilot but you must remember that you need to disconnect it with CTRL + R. What I tend to do these days is let the aircraft settle on the ILS and when everything is nice and stable (flaps are all down and the speed is correct) I turn the autothrottle off early. If you forget to turn off the autothrottle it can be embarrassing - and you don't usually spot it until you come to round out and find the aircraft isn't slowing down at all. By the time you realise this and hit the disconnect button it is usually too late to land because you are a good way down the runway.
Q. Should vectors from ATC be dialled as is into the autopilot (allowing the wind to affect the true aircraft heading) or should the given heading be altered to take into account the wind, so that the aircraft tracks the heading given by ATC?
But how would you know how much drift to account for and dial in? In truth you must fly the ATC assigned heading because you would run into serious trouble by interpolating your own.
All ATC see on radar from your dot trace is your track over the ground. We see your actual heading as a time line but this is irrelevant - it is the track that is important. Our heading instructions are based on the track seen and are intended to get you to point A and B and C. If you are drifting off the intended path a course correction is given.
When giving a turn towards the centreline we already have a good idea what the wind is doing to you and so our heading should put you on the ILS at the correct distance. If not then we have not allowed enough for the wind - but that will have sunk in for the next aircraft.
If you start working out your own drift and apply corrections to given headings then ATC will assume that your track is now a result of the heading ATC have issued. Seeing you go off in a direction that wasn't planned we would therefore issue you with a correction that will compound the situation as you then apply further interpretation for the new drift angle. It would all end in tears..
I was inbound to Gloucestershire with VATSIM, and with the poor weather was obliged to fly the NDB/DME procedure to 09.
Having had a good look at the plate now I honestly think this NDB procedure is one of the least friendly I have come across. The standard overhead procedure is normal enough but those two DME arc joins are not at all user friendly. Too much work to do in a short time and too much cross checking.
I'll run through the direct arrival from the northwest as this seems to be the one you tried to fly.
Assuming you are tracking in on the 135 QDM to the NDB at 2800ft all is plain sailing until you get to the 10 DME point. Note that this is the IAF and you need to buttonhole it quite accurately - if you are off the fix by any margin it makes the rest of the procedure a real handful.
At 10 DME you start the procedure. This calls for a right turn onto about 225 to pick up the 8 DME arc. At the same time you need to start your descent to 2200 ft so you have several things going on at the same time - a descent profile and trying to pick up the correct arc. I don't like this as it divides the concentration but I confess I don't like arc procedures anyway.
Assuming you hit the arc correctly and at the right height you then have to watch out for the intercept radial. With a normal ADF (RBI) you do indeed have to look for the 14 degree split but with an RMI always giving you a true QDM you wait until the needle is on the 108 bearing. At this point the workload increases. You start your turn to intercept the 094 QDM and also start your descent to 1650ft. If you have got inside the 8 DME arc then things will happen faster and so you must be prepared to descend quicker and turn quicker too. OTOH the procedure is designed around a nominal approach speed of (I think) 130kts so if you are faster or slow you have to adjust your turn onto final accordingly to avoid an undershoot/overshoot.
The critical point in this approach is the 5 DME check as it is the first point at which you can check you are correctly on the centreline at the right height. If things are not good here then it really would be better to throw it away and try again. At 5 DME you then need to descend to the SDF height of 570ft. It doesn't mean you have to be at 570ft by the SDF at 3 DME but you can't go lower than 570ft at this point. The recommended profile of 305ft/nm is a standard 3 degree glidepath so you can settle on 5 x G/S for your RoD.
Assuming you are nicely on the centreline and don't have to worry about descent rates as well as course corrections you should be at 1340ft at 4DME, 1040 at 3DME, 730 at 2DME and 410ft at 1DME (or your minima for that approach). MAPt is 1DME so if you can't see the runway it's a go around.
If you do see the runway it will be to one side (left) of your approach as the IAP is offset by 6.5 degrees from the runway centreline. You don't hit the runway centreline until 0.8DME - by which time you'll be setting up for landing or going around anyway..
Decision Height and Minimum Descent Height
Should I use Decision Height DH or Minimum Descent Height MDH?
Another can of worms has just been opened.. <vbg>
As Peter says it is not a specific figure as it will depend on airfield equipment, aircraft type and pilot qualifications. To give just one example, the DH for a CAT3 ILS will depend on the standby generators at an airport - specifically their cut in time. You don't want to be down to 50ft above the runway and have the ILS signal drop out because of a power failure so every airport has to have standby generators and these must come in quickly. The cut in time can determine the categorisation of the ILS. So do other factors like approach lighting and runway lighting but I'm getting too deep now.
If you want to know how aerodrome minima works the basics can be found in the AIP. Go to the AIS site and bring up the Aerodrome section but go to Aerodromes General rather than Aerodromes Specific. Click on the page that says AD1.1 Aerodromes/Heliports Availability (the CAA have got the link wrong here). This will link to an 18 page PDF file.
Skip over the first five pages until you get to the section called Aerodrome Operating Minima. The rest of the section covers the whole area of arrival and departure minima and how they are worked out. It's good reading if a bit deep and it will certainly give you an understanding about minima. For GA pilots (I should really say non public transport flights) there are slightly different rules and these are contained in CAP507 Aerodrome Operating Minima For Private Pilots. It's a pity that this is not one of the free downloads from the CAA publication library as it is also very good reading.
For individual airfields the UK have introduced what is known as State Operating Minima. If you don't have a company minima or haven't worked out (as Peter did) the minima for a specific approach then ATC should advise you of the state minima for a specific approach. This information is published in the Aerad and Jepp docs and I think it's also in Pooleys (it used to be) - but it isn't in the UK AIP any more as far as I can see. It used to be published in Section 2.22 for each airport but it isn't there any more. I'll have to find out why - I guess the rules may have changed.
For a very basic guide for your FS flying then you can set an MDH of 450ft for a LOC/DME, VOR or NDB approach and a DH of 250ft for an ILS. That's AAL of course. <vbg>..
If you have an engine failure whilst in the cruise in a twin and can get the dead prop feathered then it's not really a great deal. Even on the draggy Aztec it only lost about 10kts cruise speed - which makes you wonder what the second engine is there for <vbg>.. I must admit that it's a bit odd looking at a stationary prop in flight though - something I never got used to.
Two important things about having a feathered prop though - which apply just as well in FS if you get a flight model that can feather (the Baron does but the Aztec doesn't and cannot maintain height on one). First is that you avoid turning towards the dead engine. Simple reason for this is that you have quite a bit of rudder applied to correct for the adverse yaw. Once you bank towards the dead engine you will sideslip and you may not have enough rudder left to check this. Some of you may remember a good example of this in the Atlantic crash at Farnborough many years ago.
Second is that as well as trimming the rudder to counteract the yaw of the dead engine you must also apply 5 degrees of bank to the live engine.
Controllability is the number one factor in any aircraft emergency and this is why the pilot made a full circuit rather than join on left base. With a dead engine you are going into the danger zone as soon as you get flaps and gear down. The extra drag is going to take you downhill and you MUST be able to judge the rate of descent correctly otherwise you may discover that you are landing short. If this happens you've got a real problem. No quick left bases here - it's best to establish on a longer final and get that set up nicely so you can concentrate on the one important issue of the descent profile.
With gear and flap down you watch to see the nominal touchdown point of the aircraft. If it is well into the runway that's OK because you can always reduce power to steepen the approach. If you are landing short you haven't got a chance and you must immediately get full power on, gear up, flaps up and then climb away for another try. Painful on one engine as the climb rate is chronic..
Once you are absolutely sure you are going to get on to the runway you select full flap. I mean absolutely sure too because with full flap you are committed to landing - full power will not stop you descending. If you've got it wrong you have only a few seconds to realise you've made the wrong decision. Personally I don't drop full flap until over the threshold.
The standard twin competency check calls for a normal take off and circuit. On the next take off the engine is failed. If below Vmca you abort the take off otherwise you keep going. Instructors tend to fail the engine right on Vmca so you have the worst case to deal with - minimum speed requiring absolutely full rudder to counteract the swing. You then fly a single engined circuit and approach. On short final the instructor will make you go around and complete another circuit to land.
My first instructor also used to say that the rudder trim had failed and that meant flying the circuit, go around and second circuit with your foot hard on the rudder to counteract the asymmetric force. This was in the region of about 35/40lbs and it wasn't funny - I'd often get out of the aircraft with that leg totally wrecked. He wasn't a wicked instructor but he used to say "Anyone can fly with one engine shut down. It's when something else happens that you really have to work hard."
Local fire services are usually called out for an emergency as you never know how much backup you need. The other thing is that it keeps the airport operational if the airport vehicles have had to discharge their weapons.
Why is bank applied?
The bank should be applied to all engine failure cases as it is related to the adverse yaw caused by the failed engine. The critical engine isn't relevant here - but it is highly relevant in the case of pilot limitation. If the critical engine has failed then the yaw is greater (and the rudder force needed to contain this is the higher). This will put a severe load on your leg in trying to keep the aircraft straight and it is likely that you won't be able to contain it very long. Personally I try to lock my knee over centre so that it is bone rather than muscle trying to take the strain but I recall one flight when I could feel it was going to give - and I know I could not have done anything to stop it. Not a pleasant feeling.
The warning about not turning towards the dead engine is a little more flexible in that, if really necessary, you could do this but only very, very gentle turns only. It is far too easy for the aircraft to slip into a spiral dive in this situation so its really not recommended.
One point I'd like to make is based on my own observations and I must add that it's not part of any official thinking. You may agree or disagree as you wish - I add it out of interest.
Engine failures in twins are very serious matters and the track record of survivability isn't good. It's true to say that many accidents in the past have started off with an engine losing power (or partially failing) and with the aircraft going into the deck a few moments afterwards. In my research through many such cases a pattern emerged that showed the cause of the accident was not the engine failure itself but loss of control of the aircraft following the failure. Most post impact investigations showed one engine running at max power and the other producing little thrust.
We all know the golden rule nowadays is that flying the aircraft is the first priority in any situation. Too many perfectly sound aircraft have flown into mountains or the ground because of distraction with others tasks. This is horribly apt for twins because an engine failure needs immediate cockpit action to correct the problem - if you don't do them fast enough the unfeathered prop is going to end the flight very quickly indeed (and I can assure you that it's bad enough when the prop actually IS feathered).
The trouble is that just after take off you don't have enough time. Lose an engine and things can go pear shaped in seconds if you don't go through the drills fast enough. You MUST get the yaw contained immediately (and at Vmca absolutely full rudder is required) and you MUST get the dead engine's prop feathered. All the training is concentrated on getting those drills done as quickly as possible and you practise this again and again and again. Anyone spot the trap this leads people in to?
In fact there are three traps and I've known good people (some were good friends) who have been caught out by all of them.
Trap one is the need for speed. Go through the drills as fast as possible as it is essential to get that prop feathered before the oil cools too much in the governor. This means you don't have much time to identify the failed engine - and people have got this wrong. This has caused a few accidents but isn't the prime killer.
Trap two is the mindset caused by the training. The focus is on getting the aircraft into a flyable state as quickly as possible by containing yaw and securing the engine. This diverts you from flying the aircraft and it is here that most people get killed - they let the aircraft get away from them. Far too many aircraft are out of control when they hit the ground as pilots struggle to contain the failure.
Trap three is associated with the above. Because all the training is dedicated to securing the dead engine and keep the aircraft in a flyable state pilots don't consider the alternative.
Consider the condition right after engine failure. First the aircraft is yawing rapidly owing to power differential plus the huge amount of drag from a windmilling engine. In this state it is not going to stay in the air - full stop. No aircraft can stay airborne with an unfeathered prop as the drag is just too much. Full rudder is needed to contain the yaw (the aerodynamic problem) but then the pilot has to take his eyes away from the windscreen to sort out the engine problem and get it feathered.
It is here that the accident sequence really begins because once your eyesight moves away from the windscreen you have lost any clues as to how the aircraft is behaving. You won't notice that yaw or roll has begun again and it only needs a second or two to put the aircraft in a non recoverable state. By the time you look up again it may already be too late.
The sole reason for loss of control is lack of visual perception - the aircraft is entering a non recoverable position because you are too busy to see it happening. You can't help this as you have to get the engine feathered - but with the aircraft on the edge of the flight envelope with full rudder needed this is the worst moment to be looking away.
What if you took the yaw problem away so that you could sort the engine out without fear of losing control? Without yaw the aircraft would be stable enough to give you the few seconds you need with your head inside to sort the controls out.
I wonder how many twin pilots would actually think about reducing power on the live engine? To me the loss of control is directly attributable to the forces produced by the live engine running at full power.
Yep - it sure depends on height but the truth is that if you are so low that you can't get the prop feathered anyway then you are still going to be facing a forced landing. A twin with both engines closed is far more flyable than one with asymmetric power.
If you are a little bit higher then you'd go for the shutdown routine. To really be safe though you would have to look outside a few times whilst securing the engine to ensure the aircraft wasn't getting into a dangerous attitude. This is difficult with both full rudder applied and your attention then diverted on the shutdown routine and pulling all the right levers. Until all this is done the aircraft is still going downhill.
If you pulled the power back on the live engine then the rate of descent will increase - but not by a lot. You wouldn't have to apply anything like full rudder and the aircraft would be far more stable - it wouldn't be half as critical to take your eyes inside to sort out the engine.
Just my own thoughts.
As to the big tin I'm sure they mostly do their engine failure cases in the sim these days. For live training I suspect they could still partly simulate an engine failure by bring back one engine to neutral thrust but this wouldn't be of any value except for handling purposes (maybe useful during an hold or ILS procedure to see what the pilot does). It wouldn't produce all the system failures had the engine fully quit.
I'd
noted the two different, Cat related, JSY departure courses. Which brings
us to the next one; is the CAT aircraft type specific, company set, or
what? The most common a/c flown by JHB, in the IVAO sessions, seem to
be B737, A32*, F100. Are there specific CAT applying to each or would
it be a common one for the group covered?
How
deeply do I dive in here?
In the past I have had quite a few innocent questions that have opened
up huge chasms <g> but this one is a bit trickier.
I could answer it in a few lines but then I see the thin ice that it is
leading towards - something I have been avoiding for a few years. I suppose
it is inevitable but FS is getting so good that it is requiring more and
more understanding of real world procedures and IVAO amplifies this. I
don't think we can avoid the thin ice much longer.
Topics I have covered in the past have been interesting to you (I hope)
but I think we are now reaching a point where we are going to have to
go further. I say I have been reluctant to delve into this area and this
is because FS is supposed to be fun. My tutorials have mostly been on
subjects like navigation or aircraft performance - meaty stuff that is
a good and enjoyable read. Going onward is pressing us more and more against
the doorway marked Rules and Regulations and I really do hesitate in pushing
you through it.
The trouble is that all real pilots have to do a lot of ground school
as part of their training.
The trouble with FS (and IVAO) is that you aren't PPL's because you all
fly around in big tin - you are ATPL standard.
The trouble is that all the groundwork is missing...
The trouble is that I've avoided this groundwork as it is not exciting,
meaty stuff. It's tougher stuff, not the least because some of it is dull.
I guess that we could possibly take it in stages and that we build up
knowledge slowly.
Back to aircraft Categories. I'll just include a snippet from the docs
to show you what that thin ice is covering..
1 Holding
and Approach to Land Procedures
1.1 General
1.1.1 UK Holding and Instrument Approach Procedures are designed using criteria contained in ICAO Document 8168-OPS/611
(PANS-OPS) VOL II. These criteria include:(a) The use of Obstacle Clearance Height (OCH) as the basic obstacle clearance element in calculating minima;
(b) aeroplane categories related to speed, which can result in a reduction of Obstacle Clearance Heights for the more
manoeuvrable aeroplanes;
(c) the definition of a Missed Approach Point for non-precision procedures;
(d) the use of the term 'Decision Height' in relation to precision procedures and 'Minimum Descent Height' in relation to nonprecision
and Visual (Circling) procedures.1.1.2 The UK Holding and Instrument Approach Procedures appear at AD 2.24.
1.1.3 PANS-OPS stresses the need for flight crew and operational personnel to adhere strictly to the published procedures in
order to achieve and maintain an acceptable level of safety in operations. In addition, within the UK, procedures contained within
Controlled Airspace are subject to Rule 31(3)(a) of the Rules of the Air Regulations 1996 (IFR within Controlled Airspace).
Jump here to skip two sections on Visual Manoeuvring and VDF letdowns.
3.10 Aircraft Categorization
Aircraft
Category A - nominal Vat less than 91 Kt IAS
Aircraft Category B - nominal Vat 91 Kt to 120 Kt IAS
Aircraft Category C - nominal Vat 121 Kt to 140 Kt IAS
Aircraft Category D - nominal Vat 141 Kt to 165 Kt IAS
Aircraft Category E - nominal Vat 166 Kt to 210 Kt IAS
Note: Nominal Vat is defined as 1.3 x the stalling speed in the landing
configuration at maximum certificated landing mass.
I've skipped the rest but you can look
it up in the AIP at ENR 1.5.1.
Aircraft categorisation allows the planners of IAP's to draw up appropriate procedures for aircraft of varying speeds. The categorisation is not only essential for the basic IAP itself but for associated procedures like holding patterns, missed approach and circling minima. Each of these will be drawn up with regard to the aircraft's speed, it's turning radius and its probable climb and descent gradients. The rest of the ENR pages are full of diagrams and tables that amplify the text.
As for the aircraft you mention most are likely to be in Cat C. Note that the nominal Vat is defined as being at maximum certified landing mass i.e. MLW so the real weight of the aircraft is not of consequence. The F100 might just creep into Cat B as it was designed for short field capabilities and its big flaps might push down the stall speed into the Cat B area - that is just a guess though.
If we start getting into these deeper waters again I won't refrain from answering the questions. They may get a bit complex though - it depends whether the answer involves other unknown subjects!
According to my UK AIP for EGJJ, quote "Aircraft via Skerry or Bukli will use Star Jersey 1F or 1P, as appropriate UNLESS INSTRUCTED BY ATC TO USE Jersey 1N or 1Q" (1Q is the direct to JSY STAR from BUKLI.)
Jersey 1P is the STAR I had programmed into my FMS (FSNAv) and as you know is a South About arrival i.e. BUKLI - CHUBB - OYSTA - PERCH - JSY VOR
Given a choice of arrivals should not the ATC controller have been more specific, as hinted by Gerry. I have a slight suspicion that in this instance the controller was not exactly sure what the correct STAR should be in this instance and indirectly thrown the responsibility back to the pilot.
Good questions Alastair - and they are the reason I mostly plug in at non STAR airfields or centres in IVAO.
If you are to plug in as an APP controller at any STAR/SID airfield then you've got a lot of homework to do beforehand. You really do have to know the procedures quite well and that means pouring over them at least the night before the session so that you know all the nuances of the plates.
Jersey is a good example. As you rightly say the normal inbound route from SKERY is via CHUBB and OYSTA that takes you south of the airfield the long way round. This is obviously (to me) a route designed to keep inbounds away from the outbound aircraft so that you don't have to restrict departures in respect of the inbound aircraft. If they have no departures when you call them I'd guess they would clear you direct to JSY VOR for a quick right base onto 26.
I can't comment further because I don't know what Anthony actually said to Gerry. If he was cleared to the JSY VOR on first contact and then subsequently told to fly the "standard procedure" then that is OK. Gerry should have then turned to the VOR and gone right into the IAP (nice too as it would have chopped a lot of track distance off the flight).
If on initial contact to Jersey Gerry was NOT given any redirection then ATC would have expected him to fly the standard STAR the long way round to the VOR. Only then would he have started the IAP. This gets a little interesting so bear with me..
You know that the STAR ends up with a left turn to JSY VOR from PERCH. You also know that the IAP begins at JSY with the aircraft going outbound on Hdg 111 - so how does the aircraft get to leave the VOR heading east when he has just approached it on a westerly heading?
This bit is always tricky because it is rarely published. The Initial Approach I mentioned in the first email is just that - the point at which ATC take you from the airspace boundary to the holding fix. The Final Approach procedure is that as published in the IAP - and the two procedures may not coincide. In this case they do in a geographical sense but there is no explanation how the pilot reverses his course to leave the VOR on a track of 111.
The missing bit is called the Intermediate Approach Procedure and this is the point at which the pilot leaves the holding pattern to begin the IAP procedure. To be fair I must admit that there used to be a lot of gaps like this but the CAA are finally revising IAP's so that they give more continual guidance. A good example is Heathrow where the SID finishes at BNN VOR but the original IAP was just a straight line from the runway out to about 12nm whereas it now shows the procedure all the way back to BNN..
Back to Jersey and you have just finished the STAR by the left turn from PERCH onto the VOR. You are then cleared for the ILS/DME approach for 26 which requires you to proceed outbound from the VOR on 111. How do you do it? This is actually up to the pilot and what I would do may not be the same as anyone else. I would like to be established on the 111 radial (or close to it) even before I left the navaid so what I would do is this:
1. Enter the VOR on a heading of 270 (roughly) at the end of the STAR.
2. Continue past the VOR on the same heading or maybe nudge slightly left onto 260.
3. At 3 to 4nm DME retune the OBS to 111 and start a right turn all the way round to pick up that radial.
4. Establish on 111, run over the VOR and carry on outbound for the letdown procedure.
Effectively what I have just done is a teardrop to the right to allow me to start the IAP from a nice position - no juggling with headings overhead the VOR.
Actually, what I would do in real life is a bit of a cheek but on reaching PERCH I would ask ATC if I could go straight into the outbound procedure for the IAP. If they agreed I would leave PERCH on a Hdg of 089 dropping to 2000ft and at 8nm DME turn left to intercept the ILS. <g>
If a procedural approach works well then ATC don't really need to know too much about actual aircraft position. This may sound odd but procedural works by vertical separation rather than horizontal. In this case ATC would need to know when Gerry was overhead the VOR, when he was outbound from the VOR on the IAP and when he was established on the ILS.
I bet this is going to lead to deeper questions.. <vbg>
STAR 2
This is why, in real life, an aircraft will tune into the ATIS whilst en route. The crew will then dig out the appropriate plates and run through them in the landing briefing. This is done on every flight - regardless of whether you have been into the airfield thousands of times before. If it's a new airfield then the landing briefing is quite critical and more attention will be spent going through the plate.
To make life easier the approach procedures are standardised. Nowadays most airfields employ the teardrop approach as it is easier to manage than the old reverse course approach. All you really need to check is the outbound heading, the descent altitude and the DME distance at which the turn to the ILS starts. At EGNS I know we go out on the 101 radial to just 8DME dropping to 2000ft. That's from the RWY NDB though - the procedures is quite different from CAR NDB.
This is the rub though - there are usually several variants of the procedures and you have to be clear which on you are using. At EGNS we can start the procedure from any of the holding stacks - KELLY, VANIN, IOM, RWY or CAR - so the plate shows all five. CAR is the worst <g>..
ATC will clear you to one of these holding stacks and it is up to the pilot to work out the one he needs. The rub is that ATC will not know the actual procedure employed because some relate to aircraft category and only the pilot will know which approach is appropriate. Although Anthony knew the cleared procedure would put you on the ILS at Jersey he would not have known if your outbound heading would have been 111 or that for Cat C or D aircraft - only the pilot would know this.
Stick with this because reading (and flying) IAP's can be very rewarding. It's what pilots do endlessly during their flying training. Obviously an ILS approach is the easiest because it has glideslope guidance but examiners are a cruel lot and it always seems to be an NDB approach that the poor pilot is asked to do during the test - sometimes asymmetric too.
I'd not suggest anyone here tries an NDB approach except in zero wind conditions unless they already know the basics of NDB tracking. It's something that really can't be self taught as you need to understand a few basic concepts about tracking and drift correction first. Flying to an NDB is easy enough but then it gets more complex, such as intercepting a specific inbound "radial" to and NDB and maintaining that radial when there is a crosswind.
I'm glad this topic has cropped up though as it is a gap in our current experience that needs filling.
STAR 3
I'd
got that but when I asked for confirmation that I joined the ILS for 27,
after flying overhead JSY, I just got a repeat of Follow Standard Procedure.
The STAR, as far as I can see, doesn't route, in detail, from JSY to either
rwy, so the absence of vectors, or additional info, left me with the apparent
options
1) JSY, then left hand circuit to join 27 ILS, as in the MAP
2) Approach JSY, from the North, then turn downwind, to join 27 ILS from
a right hand base leg. Which is what I did.
3) Panic
None were right but I'll have to wind the clock back to explain this. Bear with me as this is important reading and will take you one step further in knowledge..
You have all jumped into the real ATC world at the deep end and, as a result, have somewhat missed out on some basic essentials. The IVAO world is not just an ATC simulation but is more specific - it's an ATC radar simulation and assumes that all aircraft will be radar guided and vectored. In the real world not many units have radar and so there is a second method of controlling which is actually the basic method of ATC and which you don't really know anything about in depth - although I do mention it from time to time in these posts.
Procedural control is the basic form of controlling aircraft in the UK. It's all done by timings and fixed routes and it needs a clear understanding by both controllers and pilots to work. It's hard work and so it takes up a large chunk of both pilot and controller training. Radar obviously makes life a lot easier and so it is accepted as the norm in the real world at those units it is fitted. Many pilots will fly around every day in a full radar environment and never have to resort to procedural methods - but it doesn't mean they don't know them. If a radar fails then ATC and the pilots will immediately shift over to procedural control, as Anthony did last night.
You are flying into Ronaldsway from WAL VOR. Normally you would expect to be put over to EGNS_APP approaching Kelly and expect to be told "this will be radar vectoring for the ILS runway 26." or similar. ATC will then turn you right onto a heading of around 345, drop you to 3000ft and, a little later turn you left again to hit the ILS. Piece of cake for ATC and a doddle for pilots as they just dial in a couple of headings and leave navigation in the hands of the controller. They assume that the end result will put them onto the ILS at the right distance and height for a nice coupled approach. You've all done it, it's easy and you get to think that flying is a real doddle.
Now go back to the days when you flew around in FS without IVAO and had to plan your own approaches to airports. Harder isn't it? If it wasn't for FSNav it would still be tricky for many pilots to get from position X to a 10nm final for the ILS on a nice closing heading. You can do this from the navaids alone but the trouble is that most of you haven't been trained to develop positional awareness from navaid readings because all the goodies in FS have taken that work away from you. In real life we don't have FSNav and so we fall back onto Procedural Control. What is this?
Procedural Control is the basic written procedures for all UK airports contained in the AIP. They exist for all airports that have a published approach procedure - whether ILS, NDB or VOR. Technically every pilot should plan to fly the procedural approach - it's what should be put in the flight plan - and they should also be prepared to fly it too. Most times they will not because radar will be available to expedite matters but this is what the difference is between yourselves and real life pilots. The latter will know the procedural approach (and can fly it) whereas FS pilots tend to assume that radar will guide them in.
The approach procedures are all there in the AIP. They are split into Initial Approach procedures (basically the STAR's) which take you from airways to the holding facility at the airfield and the Final Approach procedure which is the specific procedure for a particular runway and approach aid (such as the ILS approach for 26 or the NDB/DME approach).
Anthony was correct last night in that the STAR ended up at the holding fix for Jersey - the JSY VOR. With no radar you could have been put in the hold at the VOR but there was no point as he had no conflicting traffic. He therefore allowed you to continue with the approach by clearing you for the "standard procedure". Actually this isn't quite correct as it doesn't specify which procedure it is but that's beside the point as all I would have said "Cleared for the ILS procedure for 26." So, you are over the VOR and have been cleared for the approach procedure. This is where you must turn to the Instrument Approach plate page.
The IAP is the procedure that takes you from the hold to the runway. You all know these as they are seen in many places - even in the books that used to come with the earlier versions of FS (sigh). For Jersey it's quite simple - you leave the VOR on a track of 111 descending to 2000ft. At 8.5DME you turn left to intercept the ILS. The IAP also contains the correct Missed Approach procedure (MAP) so if all goes wrong you should follow this back to the hold for another try.
In last night's case the ATIS should have given you the landing runway so I would have automatically got out both the STAR chart and the IAP for 26..
When you are inbound to an airfield the Centre and Approach controllers have to agree what we call a clearance limit. A good example is from last night where I wanted all inbounds to be at FL50 by VANIN. The Centre controller then has to sort the aircraft out so that they descend in time to hit the fix at the right altitude.
To a pilot he should say "JHB007 is cleared to VANIN at FL50". In the real world a pilot then knows he is cleared to VANIN (but no further) and he has to be down at FL50 by that point. The Centre controller should then pass the aircraft over to APP as soon as possible - certainly not as the aircraft reaches VANIN. If left too late the poor pilot has no option but to go into the hold because he needs further clearance to proceed from Approach.
This doesn't happen in IVAO because the controllers don't really know the procedure for handing an aircraft over. When it is quiet it doesn't matter and mostly they use FL120 as the point at which they throw aircraft to the next unit. When it gets busier this doesn't work. Last night I suspect Alex tried to control you all right up to VANIN or KELLY but then got too busy to hand aircraft over properly. He talked to me about JHB153 but then he just threw the rest of you over without co-ordination at all - which didn't help.
In real life both Manchester and Ronaldsway would have realised that the mass of aircraft coming in are an Approach problem and Manchester would have given us all the aircraft well in advance so that we could sort things out early. In IVAO controllers don't realise that they can do this and they try to control up to the edge of their airspace. Alex thought that he had no reason to give aircraft to me until the IOM Zone boundary but he should have passed them over when still on the airways system. Actual airspace boundaries are not actually relevant - but IVAO controllers think they are absolutely rigid.
In truth, if it gets busy and you are trying to talk to me then do what we do in real life. Simply say "JHB188 is with you". It's short, it lets me know you are on frequency and I'll come back to you as soon as I have time to give you an instruction.
Many
fixes have been introduced since GPS became an accepted navigation tool
and the trend is to create airways that are pure GPS navigation - they
can't be flown by an aircraft with basic VOR and NDB kit. This will continue
because airways can be very easily created now they are freed from the
restraints of building ground based aids.
If we switch from the en route phase to the approach phase then fixes
are different. Fixes used as holding patterns are almost always aligned
with a VOR radial - which is why the VANIN hold is aligned to the IOM
VOR rather than on a heading to CAR NDB.
For the hold you have two essential bits of information. One is the holding
pattern's inbound heading and the second is the DME distance to mark the
fix. In the case of VANIN you should already be tracking to it on 285
(established on the 105 radial from IOM) and you enter the hold as DME
hits 26NM. Make sure you keep your OBS on 285 so that the needle allows
you to intercept the radial again as you finish the hold.
You start the hold as I have described with a Rate 1 turn outbound. The
outbound leg should be flown on a heading of 105 (no wind) but in
real life you need to calculate the drift angle and apply 3 x this to
the heading. You fly this heading for one minute but, just to be really
accurate to RW procedures, you also have to take into account and headwind
or tailwind and increase or decrease the time by 1 sec for every knot
of wind.
This is the complexity we face in real life and I wanted to avoid it in
FS as it cannot be explained in a few sentences on a web page. Assessing
drift in a hold or when flying an NDB procedure is tough work, needs complete
understanding and a lot of practise - it's the point at which you need
serious help and need to start reading the books.
Well before we start holds in real life our I/R training goes right back
to basics and we learn to fly to (and from) a VOR on a specific radial
- and most of you can do that. I wonder how many of you watch as the autopilot
tracks into the VOR and you make a note of your drift angle? We also learn
to track an NDB on a specific heading - much harder - and learn to correct
for wind from observing the rate of drift. This takes a lot of mental
calculation and older pilots have been doing this since WW2.
Without these skills (tracking an NDB and adjusting for wind in a hold)
you have to accept that your holds will remain rudimentary and it will
be a matter of luck if your stopwatch hits the 4 min mark as you cross
the fix again. Despite this it is still worth doing because as you practise
you will develop a feel for the procedures and will begin to sense what
wind is doing to you.
Back to the VANIN hold. You have turned outbound and fly the outbound
leg on a calculated heading for a calculated time. At that point you turn
inbound again and if you have the wind hacked you should turn in right
back on the 105 radial. Now this is the important bit - during the turn
watch for the needle and intercept the radial as you would for an ILS.
Don't just dial in a Rate 1 turn and watch it happen as it takes you past
or short of the radial - start working to hit it.
The whole purpose of the hold is to be back on that radial as you finish
the procedure. It's a feather in your cap if you can do this in exactly
4 min as you then have the skills beloved of hoary old pilots like Gann
and Bach - but things are changing. Nowadays they publish a distance at
which to start the inbound turn (DME 31 for VANIN) and this means the
old four minute hold is no longer as crucial in timing as it once was.
I am just grateful I learned these skills as I can relate to how the old
pilots flew.
So establishing on the inbound radial is very important but a four minute
pattern is not as critical as it once was.
I once flew the BEL VOR hold in a PA28 when there was a 45kt crosswind.
That produced a 25 degree drift angle - which meant that I should have
flown the outbound leg at 3 times that. That is impossible and the max
limit for the outbound offset is pegged at 45 degrees. When I started
the turn back into the VOR it was inevitable that we would be blown right
through the inbound track and I needed far more than a Rate 1 turn to
capture it. Flying holds in a light aircraft without autopilot is about
as hard as you can get - their slower speeds mean bigger drift angles
and the manual flying coupled with the mental workload can be exhausting.
I guess I should add the above to a final web page on the subject but
I fear it would frighten people off. It's not meant to but I think you
should fully appreciate the forces that are at work when it comes to even
basic VOR or NDB procedures.
I hasten to add that there were no detailed instructions in that email - just a description of the procedure with only minimal detail on how to fly it.
Needless to say it is imperative that the related IAP's need to be downloaded and printed. All mine are mounted in a plastic wallet for easy reference - it sits alongside the wallets containing the checklists for the aircraft I flew and all are immediately to hand for use in FS. I go one stage further too - I write on the plates. I still use a chinagraph pencil but a good spirit based felt tip is just as good. First thing I write on the plate after receiving the ATIS is an arrow showing wind direction - and if you have the 3000ft wind so much the better. This gives you an immediate indication of the drift effects for the holds and procedures and you can roughly work out drift angles. I say roughly because Met wind isn't 100% accurate but at least it gives you a starting point.
Second thing I draw on the plate is my intended route from the stack to the start of the IAP. This includes any teardrop patterns I may have to fly to establish on a fixed inbound track. I also write down my DH/MDH for the approach plus anything else I think pertinent - some plates can be difficult to read so it may be worth marking bits that don't stand out.
I/R flying is high intensity mental work. Sometimes you may be given a procedural approach you haven't planned for (ATC may switch runways) so the ability to read a plate quickly and work out your new flight path is essential. It need not be said that I/R flying requires most of your concentration so you should already be completely familiar with the aircraft your are flying, know how to manipulate the autopilot and Nav boxes quickly and interpret the Nav gauges - you must fully understand the data being presented from Nav 1, Nav 2, ADF and DME. You should also know the performance of the aircraft, know it's holding and approach speeds and generally be able to fly it without thinking - leaving all the mental load to the procedures.
I will add a page to the JHB site for I/R work and upload a picture of the Manx I/R Route.
More IAP chat
In fact you hit the nail on the head. Preparation is everything.
You could look at the plates before take off but that won't really get you anywhere because ATC may give you a different procedure from the one you've studied. In real life the crew wait until they pick up the ATIS and then, having the wind and the runway in use, they pull out the plates and go through a proper approach briefing. This starts at the holding stack (which you should know as it is dependent on the route flown) and runs through the horizontal and vertical profile of the approach procedure. Attention is paid to the navaids required for the approach, the Final Approach Fix, the MDH (or DH if on ILS) and the Missed Approach Procedure. They get this clear in there heads many, many miles before they get anywhere near the airfield and when they are back in boring, straight and level flight en route.
The trick, as I explained to Mike earlier, is to develop a mental picture in your head as to what you will be doing. You can't do this at first because there is so much stuff going through your mind - but it comes with practise. Being able to develop a mental radar image is a great help and all good pilots could do this long before GPS came along to make life a lot easier.
The Manx I/R Route is a good one and almost everyone at Ronaldsway adopted it for training. I flew it myself when my own renewals came up even though it was way over the requirement for IMC renewal. It was good though because it combined all possible combinations of I/R procedures - NDB tracking, ILS tracking, VOR tracking and an NDB hold. Sometimes it would change and an ILS to 08 would be thrown in or a VOR/DME to 08. The beauty of the I/R Route is that it is equally as demanding in a C172 as in a big jet. In smaller aircraft it is more imperative to get drift nailed and in bigger aircraft it is an exercise in speed control.
I had a guy on IVAO tonight who tried to fly the ILS intercept at 270kts and couldn't understand why the aircraft could not capture the ILS. It was hard to explain to him that turning circles at high speeds on autopilot are way above the rates needed for ILS capture (or tracking). In real life we have a point on the approach called FAF (Final Approach Fix) and if you aren't stabilised on the approach (height, speed and direction) as you cross the FAF you HAVE to throw the approach away and go around. This is a pilot decision - nothing to do with ATC - so if I see someone not at the FAF on track or miles too high all I am going to do is shake my head if the pilot carries on and wait to see the mess he is going to make of the approach. It's one of the perks of the job. <vbg>
More on Engine Out ProceduresJust one point I should make about turning with an engine out.
If you lose an engine the thrust is then asymmetric - it is coming from one engine well away from the fuselage centre line. This automatically generates a huge yaw moment towards the dead engine. For example if you lose the port engine the thrust from the starboard engine alone is going to create a strong yawing (and rolling) moment to port.
You obviously trim this out with rudder trim but you must not forget that it is still there because it alters the way an aircraft behaves as speed is altered and bank is applied. It is often taught that any failed engine requires the pilot to fly with five degrees of bank towards the live engine. This is good as it alleviates any tendency of the aircraft to roll/yaw to the dead engine if concentration lapses. It is also strongly advised that all turns be made away from the dead engine because if you turn INTO a dead engine then roll and yaw are rapid (far more than you might expect) and the aircraft can enter a spiral dive before you have time to blink. Older pilots here may remember the Atlantic crash at Farnborough in 1968 which was caused exactly by this effect.
Paul found the Dash 8 was quite forgiving in this respect and turned towards the dead engine without any serious yaw or roll effect happening. Maybe it is good flight dynamics or the fact that DHC aircraft were mostly built as STOL aircraft and have whacking great rudders. It certainly shouldn't be expected of all aircraft though - especially when you start slowing down to approach speeds when rudder authority is reduced by the diminishing airflow.
Speed restriction on most SID's is 250kts so I'd be interested if you have found any that specify anything slower.
When I give a "no speed restriction" instruction to pilots I mean that you can exceed the 250kt limit below FL100. Most jets these days use a 290/300kt climb speed up to the point where it hits M0.76 and then fly a Mach climb after so 250kts up to FL100 is a bit restricting.
If it helps here is a snippet from a Speed Control document I have:
"Looking at a typical climb/descent profile for an MD80 the following can be observed. The aircraft climbs at 290 knots IAS until it reaches Mach .76. It continues the climb maintaining .76 to cruise altitude, cruises at .76 and holds that Mach speed in descent until reaching 290 knots IAS again. As there is a speed limitation of 250 knots IAS below FL100 the initial climb will be at 250 knots IAS (289 Kt TAS/Mach .45). The aircraft will then accelerate to 290 knots IAS (334 Kt TAS/Mach .52 at 10,000 feet) and then climb at this constant indicated speed.
During this climb both the TAS and Mach number will be increasing as follows:
| Height | TAS | Mach |
| 15,000 | 359kt | 0.57 |
| 20,000 | 387kt | 0.63 |
| 25,000 | 418kt | 0.69 |
| 29,000 | 445kt | 0.75** |
| 33,000 | 441kt | 0.76 (268 Kt IAS) |
| 37,000 | 435kt | 0.76 (245 Kt IAS) |
** From this point on the pilot will fly at Mach .76 and no longer use IAS as a reference unless requested to do so by ATC.
If the crew had not changed from IAS to Mach number and tried to hold 290 knots IAS all the way to FL370, the speed at top of climb would be Mach .88 far in excess of the permitted limit.
In the descent the process is reversed. The pilot will fly at Mach .76 until the IAS reaches 290 knots, which should occur around FL290. During this part of the descent the aircraft will accelerate slightly from 245 to 290 knots IAS (435 to 445 Kt TAS). In the descent from FL290 to FL100 the aircraft will be flown at a constant 290 knots IAS and the TAS will decrease from 445 to 334 knots. At FL100 speed is further reduced to 250 knots IAS (289 Kt TAS/Mach .45). IAS will then be reduced to around 210 knots in preparation for configuring the aircraft for approach."
As IVAO gets busier (or if you try VATSIM when it's busy) you will find that speed control gets more critical. ATC cannot take a stream of traffic into an airport with really nice spacing if one aircraft is going substantially faster than the rest. We tend to ignore speed (a bit) for the moment but traffic density - as in real life - is going to force more strict procedures on everyone.
An approach without an ILS is not a big deal - you do it often enough in small aircraft and a jet isn't any different. The trick is to get the right rate of descent nailed down and here there are a few things to help. The most obvious is PAPI's but these can only be picked up fairly close in. The aim is to be at the right height on the approach so that when you see the PAPI's pop up you only need slight adjustment (if any) to keep the two red/two white lights constant. This is where DME helps you out a lot.
An ILS is normally a 3 degree glide slope and because you are used to this it is best to aim for a similar descent profile for a visual approach. There are two critical rules here. One is to start the descent at the right distance from touchdown and the second is to get the rate of descent correct. Do this and the rest is easy.
The start of descent will depend on the height ATC have dropped you to before putting you on the runway centreline. If you remember the 300ft/mile rule I've mentioned before it is obvious that if you are at 3000ft you have to start your final approach descent at 10nm from touchdown. If ATC have dropped you any lower (say to 2400ft) then you start descending at 8nm from touchdown. Get this bit right and you make life a lot easier for yourself.
Rate of descent is 5 x groundspeed. So at 160kts on approach and at 3000ft you begin your descent at 10nm and set the rate to 800fpm. There's no magic here - this will take you all the way to touchdown if you leave the autopilot on vertical nav. However there are a couple of provisos.. <g>
First is that you have to be good at speed management. It is best to have set up the approach speed before you start the descent on approach so that you maintain a constant airspeed all the way down to short final. All aircraft into Heathrow are back to 180kts or 160kts before they hit the ILS and visual approaches are just the same. If you start changing speeds once the descent is under way then your rate of descent will also alter - and must be changed. For example if you start your descent at 180kts with 900fpm dialled in (which is correct) but then slow down to 145kts you MUST reduce the ROD to 725fpm of else you will undershoot the runway.
The second problem is wind. The ROD formula is based on groundspeed and you won't really know this until you get on final. Here it is best to set ROD to IAS initially but when you get on final you can check groundspeed on the DME. All you need is a second or two to see if this varies greatly from IAS and, if it does, a quick calculation should give you the new ROD to dial in.
The ROD and speed should be maintained until you pick the PAPI's up. After that you have visual guidance for descent and so you can start slowing down to your Vat speed and keep a beady eye on the lights to stay on the right glidepath.. The trick to remember here is that when you slow down the loss of lift will make the aircraft descend faster so you must watch out for this. Couple that with the need for a lower ROD as well and you can see you have a lot of up trim to apply.
Get this nailed down and flying circuits in a 747 is as easy as flying them in a C172.. <vbg> If you can fly a circuit in a balloon I'll be really impressed..
VFR flight works slightly differently to IFR so excuse me if I point out some of the procedures normally used in real life. For a start the crucial difference is that VFR aircraft are not separated by ATC - they are responsible for their own separation from other VFR aircraft. All ATC does is provide traffic information. Because of this the R/T for VFR flight is slightly different.
The problem with IVAO is that most of you fly IFR a lot and it is hard to explain that many PPL's in real life can't do this. Their world is purely VFR and they have to keep clear of cloud at all costs. Many pilots don't have the skills to fly in cloud and if they do the experience can be frightening (and sometimes fatal). Don't forget that most light aircraft have no autopilot or wing leveller so flight in IFR is purely at the skill of the pilot. It's a lot harder than FS would make to believe - I can assure you of that. If you want to find out then dial in some turbulence, turn the autopilot off and fly into some cloud - then close your eyes for ten seconds..
ATC know that aircraft flying VFR have to keep clear of cloud and this is why the phraseology is different. The first thing you will notice is that an ATC clearance doesn't include any heading or height instructions - it is delightfully basic. When you first call an airfield to report inbound the normal clearance from approach is:
"JHB034 continue to the field VFR not above 3000ft, report airfield in sight"
The above clearance therefore allows you to enter the zone, still on your own navigation and at any height you want below the nominated limit (which is only used if there are IFR aircraft above you). Without any nominated heading you can still turn left or right (say to avoid cloud or follow a coast). If ATC have any other VFR aircraft in the vicinity you will just be given traffic information and it is up to you to spot and avoid the other aircraft.
Once you get the airfield in sight and tell ATC the next call will usually be joining instructions:
"JHB034
join downwind left for Rwy 30" or
"JHB034 join base leg Rwy 30" or
"JHB034 report final Rwy 30"
If there is other traffic around you may get a different set of instructions. You might be asked to spot and follow another aircraft or you can be asked to fly to a specific geographical location - "Cleared to the peninsula to the south of the airfield - QDM is 315" for example.
The approach is the tricky bit, both for controllers and pilots, if you get a mix of traffic. Put a Cessna on final with a 737 boring in 6nm behind and you may rapidly run out of room. There are a couple of tricks here. For controllers it is best to put VFR aircraft on a short base leg or downwind so that they fly a standard circuit. This means the aircraft only turns final at about 2nm out and doesn't crawl in from 10nm at a horribly slow approach speed. The aim here is to keep the final approach as free as possible.
Another solution, well disliked by real world VFR pilots, is the "orbit downwind" instruction. Obviously if you have both a jet and a light aircraft coming in together the difficult decision has to be made as to which one is cleared to final first. If both are the same distance out the jet will obviously be first - but what if the Cessna is 3nm out and the 737 is 8nm out? Inevitably this comes down to experience and new controllers tend to play safe. The result is that the Cessna will be given one delaying orbit, the 737 cleared to final and the Cessna then given the position of the 737 and told to follow him in.
If things go a bit wrong and vectoring is the only solution for the VFR traffic then you can fall back on this. In the real world it is done at some airfields (like Birmingham) because they are simply too busy to leave VFR aircraft wandering around the zone. The wording has to be clear though "Can you accept radar vectors maintaining VFR?" - meaning ATC will give you vectors but if these put you in cloud it's YOUR fault for not saying so. That is real life though and in IVAO I guess most VFR flights would happily take a vector.
The fun with VFR traffic is that you can cram a lot more aircraft in a small amount of airspace, because there are no separation standards. If we get a good few pilots join us for the Island session it could be really good fun..
Departure separation
If ATC have several aircraft departing at the same time it could lead to potential conflict. A good example of this is a slow aircraft being followed by a fast aircraft that will rapidly overhaul it. There are many ways to deal with this - some more interesting than others. If both aircraft are ready to taxi at the same time then, obviously, it is best to ask the slower aircraft to wait a second and clear the faster aircraft out to the runway first. Do this and the conflict is already sorted! If it is obvious that the jet is going to be more than a couple of minutes longer in starting than the prop then the opposite holds true - it is better to get the slower aircraft away as fast as you can. This gives you much more distance between the two after take off and increases the options as to what can be done next. The worst scenario here is in having both aircraft at the holding point together as the prop aircraft is going to take a while giving you some space to launch the jet.
On take off you can launch aircraft very quickly if they are in order from fast to slow because none should catch up with the one in front. It helps here if ATC know a bit about aircraft types and their relative climb rates and speeds. If a slower aircraft is first then there is a bigger problem because you can only really take appropriate action after the first aircraft is off the ground. As said above, you launch the prop as soon as possible. Decision time comes when the jet is cleared to line up because only then do you know what sort of distances you are playing with. What happens next is entirely up to each controller as one of several methods can be used. Radar headings are the usual answer - put the jet on radar headings to take it away from the prop until it has climbed above it. You can also use height separation in clearing the jet to 1000ft below the props current altitude even though this may mean it will overtake the prop from underneath. You can also ask both aircraft to maintain fixed climb rates - say 1500fpm - which means the second aircraft can never get close to the first one (in height terms, not distance).
Airfield - arrival separation
This is the trickier of the two situations because it can be completely random as to how the aircraft turn up. With departures you can, to some extent, manipulate the departure order but inbounds are completely unpredictable and a far greater challenge. Not only does ATC have to get aircraft down to the correct approach height and pointing nicely at the ILS - it also has to make sure aircraft are not going to run down those in front.
Speed control should work for most jet and turboprop traffic and ATC shouldn't be timid in applying this. 210kts is ideal for initial approach vectoring, 180kts coming round on to base and ILS interception and 160kts when picking up the ILS. Once you implement speed control you have no worries about aircraft catching up those in front and it all becomes a simple matter of basic vectoring.
Sometimes this won't work and you may have a little Cessna stuck in with the big tin. This isn't nice because jets will be tramping in at almost double the approach speed and even basic maths will show that you need 8nm separation on the ILS to achieve a minimum of 4nm separation as the Cessna is touching down. One trick here is to avoid putting a small aircraft on a 10nm final so that it hogs the approach for 5 minutes. There is nothing wrong with dropping a light aircraft to 1800ft AGL and putting it on the ILS at 6nm.
When first starting in ATC you get ultra cautious and tend to put aircraft on the ILS at far greater distances between them than necessary. With experience this reduces and it can be a nice sight to see three or four aircraft on the ILS with 4/5nm separation between them. To do this though you not only need trust in your own ability but you must also have complete trust in the pilots ability as well. Always allow extra spacing for pilots who are slow in responding to instructions (they may be newbies or simply do not have fast reaction times). ATC also need to know their airfield - there is no point in getting a nice 4nm stream going for an airfield with no fast turn offs or those which require an aircraft to backtrack! <vbg>
En Route Separation
This is somewhat the easiest of the lot but can also be the most complex. Centres have to deal with aircraft flying head on to each other with some climbing or descending. It means that the thinking processes have to be turned on when aircraft are still 100nm or more apart because their closing rates can be close on 900/1000kts - about 16nm a minute!
Centre controllers have two prime jobs, the first being to sort out their en route traffic and the second being to put inbound aircraft at the right point and height suitable for handover to approach control. As the area of responsibility is huge it means that you may have to focus on several areas of the screen at the same time - not something everyone can do. It is all to easy to develop tunnel vision and concentrate in one area, forgetting about conflicting traffic 200nm away near another airfield.
For Centre controllers the standard separation tools are stopped climb/descent levels and radar vectoring. I won't go into this in detail as it's boring - and used to involve complex formulae like ((T + 10) x Comb TAS) / A/C1 TAS. That was in pre radar days though..
All light aircraft come as standard with a full blind flying panel and most have a reasonably good radio stack. FS emulates this quite well but in doing so it results in the panel taking up a huge amount of your screen. FS4 had about 50% of the screen for the panel but later versions have seen it encroaching more and more with 66%-75% being about average for FS2004 panel area.
The disadvantage of this is that FS users think the large panel is there to be used, permanently leave it on and have rather pathetic outside visual reference. I tend to turn it off as much as possible and usually hit W to fly with the limited dial set and a sensibly big outside view.
For most PPL's the blind flying panel is hardly used. Flying is taught using visual clues for pitch and roll, your bum for sideslip (or them funny canals in your ears). The only essential dials are the ASI and Altimeter and, if you've got the aircraft trimmed correctly (something drummed into you very early on) even these need only a cursory glance. 95% of the time your head is up and looking out of the cockpit.
A PPL is trained only for visual flight so the full panel is mostly redundant. In the 1970's you were given just one hour on instruments but it was more to show how difficult it was - and hopefully to stop pilots from deliberately flying into cloud and coming out again in little pieces. Over subsequent years the time allocated for instrument flight has increased but only enough to show pilots how to stay upright if they wander into the fluffy white stuff and then make very gentle turns to get out of it again.
In FS the aircraft are so stable that pilots don't think twice about flying in cloud - and most pilots have the autopilot on anyway. Put them in a real aircraft, in cloud and with no autopilot and they wouldn't last very long. If you don't believe me then next time you fly an ILS in low cloud turn the autopilot off and do it manually - the skill differential is about the same. That is the rub with FS - it gives you all the automatics and most people use them, never really learning true stick and rudder flying but thinking they are becoming good pilots.
I was taught a little trick by my instructor which I have used on a few real pilots to show them how limiting the human sense of balance is. In each case I was greeted with some scepticism but, in each case, the pilot followed my instructions - and then very nicely turned the aircraft upside down THINKING THEY WERE STILL IN LEVEL FLIGHT (at least they would have inverted had I not stopped them). Ancient Chinese proverb - Eyeballs good, senses bad - but eyeballs bugger all use in cloud.
Truth is that most light aircraft aren't stable at all. A few are but most have had a long career, suffer minor rigging distortion and are known to fly left wing or right wing low. That doesn't mean they fly at an angle but that there is a minor but constant tendency to roll in one direction. Only slight stick pressure is needed to stop this but a pilot with his head indoors for a few seconds won't notice the wing has started to drop. Whether fiddling with the radio or checking a map it can be quite disconcerting to look up and see the aircraft in a steep turn. Such aircraft need constant pilot input - something else that FS doesn't mimic. Actually, having said that I know one exception and that is my Tiger Moth which needs slight but constant rudder pressure to fly a steady heading - as does the real aircraft.
If you are flying in FS (autopilot off) and close your eyes for a minute, answer the phone or go look for a book next door chances are the aircraft would still be bumbling along when you got back. Close your eyes in a real aircraft for 60 seconds and I doubt you would like the view when you opened them again - and 60 seconds would be way too long for some aircraft. Chances are that you would most likely be in a high speed spiral dive by then. The Mk.1 Eyeball rules in flying.
What are the advantages and disadvantages of using flaps for take off?
With no flaps there is less drag and acceleration will be marginally better. More importantly you have a higher stall speed and so have to lift off at a higher VR - which means an increased take off run.
With some flaps set you lower the stall speed (as flaps are lift devices) and so can rotate at a lower speed and use less runway.
Many pilots lock on to the above rule and use flaps for take off all the time. It becomes so automatic they stop thinking about why they do it - and get uncomfortable if the habit is questioned. Flaps are good - aren't they?
No. Yes. Partly. Aviation is full of contradictory answers.
In fact flaps are only a good thing up to the point at which you leave the runway. Once in the air they become a liability as they reduce rate of climb. Start thinking about this and you can soon see what locations are better suited to using flaps and what locations would be better leaving them up.
If you have a short runway or a rough runway then flaps should be strongly considered. In the first case they get you off the ground quicker and in the second case they help take the weight off the aircraft so that drag from the soggy or rough ground on the gear is reduced.
If you have a big hill on the end of the runway it changes your whole outlook on life. Flaps will get you off the ground further away from the hill but the reduced climb rate may make the flight very brief. No flaps use a bit more runway but the climb rate is better and gives you a fighting chance.
Of course you could end up at an airfield with both a short runway and a hill at the end (or tree or pylon). Here you can only sit down and work out the figures for the aircraft by plotting ground run and climb rate with flaps against ground run and climb rate without them to see which give you the greater clearance over the obstacle (if any). Add the usual temperature, wind and pressure factors plus runway gradient and surface condition and you may find that on some days it might not be possible at all. This is where you really should start knowing your aircraft very well indeed.
In the above I used the phrase "rate of climb" but even here there are two rules and speeds to learn. Pilots have to know the rate of climb of their aircraft but also the angle of climb - they are two different beasts (known as VX and VY)..
Best Rate of Climb Speed is that which gives you the greatest increase in height over a given TIME period.
Best Angle of Climb Speed is that which gives you the greatest increase in climb over a given distance.
To stop the mental pressure this may have on some let me simply explain these by saying the angle of climb speed gives you the greatest gradient possible but you aren't going up very fast. With Rate you will be higher after the same amount of time but you will also have travelled further.
Most of the above is just for idle curiosity as FS just isn't up at this level. In real life you have far more tactile feedback and you can feel the difference between using flaps or not or climbing at VX or VY. Because FS gives so little feedback in this respect it doesn't make you question your technique or your aircraft's behaviour or the weather. You may never change your landing or take off routine ever - just use the same figures for every flight. You could never do this in real life and EVERY take off and landing requires a little thinking about.
Crews on airliners run through an approach briefing for every flight. In their case it's a review of the STAR, IAP, runway and flap/speed values. It's not a bad idea to do the same for GA flying in that you could brief yourself as soon as you pick up the ATIS for the landing point (or tune the ATIS for a nearby airfield if it has none).
Once you have the wind and declared runway it doesn't take a second to draw a wind arrow on your map and see the crosswind angle. After checking the runway length and obstacles you then review your joining procedure, your approach speed and landing technique. You could also determine your go around procedure just in case. Thinking up a plan of approach well before you get to the airfield fills up some of the boring en route time and clears your head of unwanted thought processes when you finally arrive.
All to often FS pilots tend to fly a portion of a flight and only start thinking about the next bit as they arrive. It is always better to think ahead when you have thinking time available so that you get less overloaded during the more critical stages.
There are a few oblique references to pre flight paperwork in the above tutorials but nothing solid - mainly because there is such a gap between real world procedures and FS. The problem now is that FS has become so good that it takes you into this territory.
It
is the lack of data makes this a frustrating exercise - even if you want
to do things properly the absence of material hampers the process.
There are several elements to pre flight planning. At PPL level they are
mostly quite simple and the pilot does all the paperwork. At airline level
it becomes more complex and the work is distributed - the crew do some,
Flight Ops do some and some may be computerised by being pre loaded into
the FMS.
The
basic paperwork essentials are, in order:
| Route planning | Plog | |
| Weather check | Met Briefing | |
| Fuel
calculations and uplift |
Plog again | |
| Weight and Balance calculations | Performance chart | |
| Take off/landing speeds | Performance chart | |
| Take off/landing distances | Performance chart | |
| Flight documentation | IAP's, checklists, airfield charts etc |
The degree to which these are done varies enormously. You can walk out to the aircraft with nothing but a checklist and map in your hand or you can stagger out with a flight case full of data. This will join the paperwork already in the aircraft covering insurance, Certificate of Registration, Certificate of Airworthiness etc..
The simplest flight is a local detail where you just want to fly around
the local area or bash the circuit. You don't need a plog for the flight
although a blank one should always be on your clipboard to record times,
clearances, squawks and other essential information. You don't need a
printed Met brief as you would have got a verbal brief from the Duty Instructor.
You don't need to calculate fuel because the amount remaining from the
last flight will be noted and most clubs fill right up once the tanks
get down to two hours.
You don't work out weight and balance for most flights. Most light aircraft will fly with two people and full tanks, or four people and half tanks. Whatever you fly there is usually a broad rule you can follow and if kept to you are usually below max weight and (for most aircraft) in balance too.
Likewise you don't calculate speeds for GA aircraft as they always use Max AUW values. You just use the printed take off and approach speeds - no allowance is made for varying weights until you move up to twin aircraft or bigger.
As you are flying from your home airfield you also rarely need to consider takeoff or landing distances as you should know these. It is only when flying from a short strip that may be marginal in certain weather conditions (hot, wet, windy) that you may have to get the books out.
1. Route Planning
A plog becomes necessary when landing away at a different airfield. Again you wouldn't fill one out fully if hopping to a nearby airfield - like Ronaldsway to Jurby where you just fly round the coast or if you jump the short 1.5nm from Papa Westray to Westray.
In terms of VFR and IFR plogs there is no great difference. For VFR you are map reading so your plog waypoints might be a lake, town, river or power station. For IFR you swap these for navaids and intersections but the rest is almost identical. For each leg you work out the essential figures of bearing and distance but can add other data too like planned altitude and Minimum Sector Altitude. Most FS planners from WinPlanner to FSC do this sort of thing for you.
Plogs can also provide other useful data. There can be columns for airfields and their data, navaids and frequencies. There should always be space on the plog to record clearances, ATIS, level, heading or speed instructions, squawks and frequency changes. A plog can take some time to fill in and prior to computer days most pilots would sit down the night before to fill it in. This was part of the fun of flying and a well written plog was both pleasing and could reduce flight workload considerably.
2 Met Briefing
Stage 2 is the weather briefing and I need not cover this in detail as it is obvious to most of you what to look for. As well as airfield conditions that you hope will be nice enough for an enjoyable flight (way above minima) the en route conditions may determine (if VFR) the maximum level you can expect to fly at - which will determine the en route winds you need.
Armed with the predicted winds (but never entirely trust these) you can then go back to the plog and with a CRP1 or decent calculator you can work out the heading and groundspeeds for each leg. These should give you the total time required for the flight which allows you to move onto step 3.
3 Fuel Planning
Once
you know the flight time you can then calculate the fuel needed. As said
before the standard procedure is to add destination fuel to diversion
fuel and add a further 10% to this. For IFR flights we also are required
to carry 45 min holding fuel and allow fuel burn for taxy.
This essentially completes the pre flight data on the plog and the finished
sheet looks like this (click to see full size):
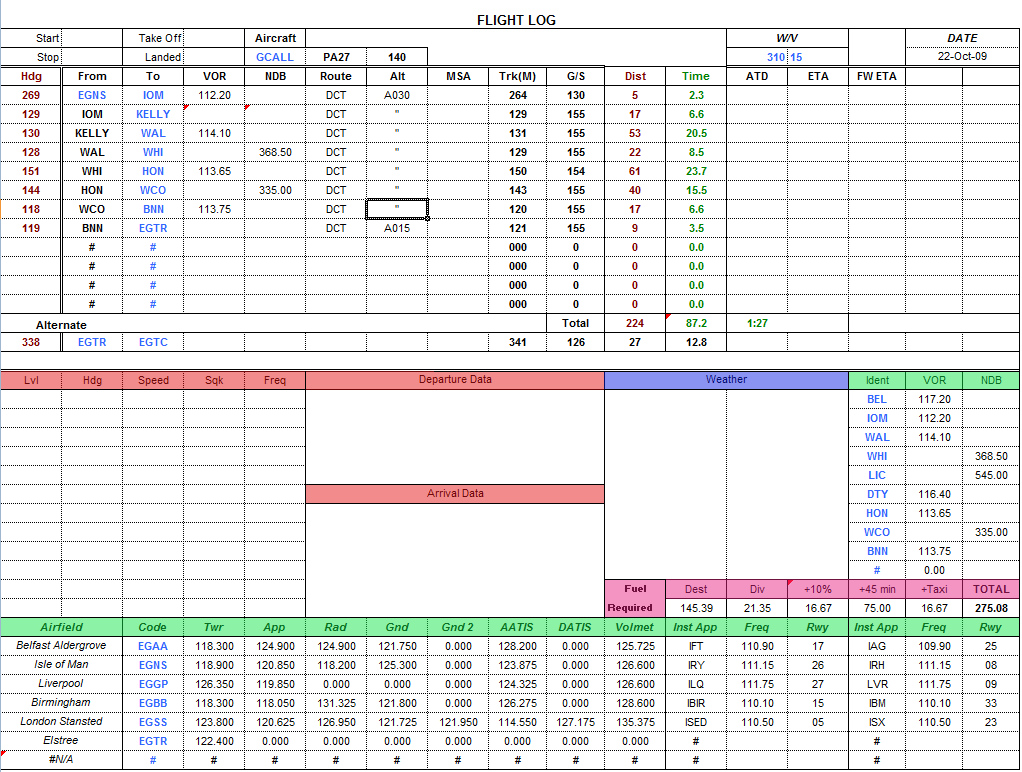
This was an actual flight but the plog is the pre flight print out rather
than a scan of the completed report - it doesn't show any in flight annotations.
As you can see it is clear and easy to use with all the data required
nicely grouped into obvious areas.
The plog is from computerised software which is a great boon - no need to work out distances, headings, frequencies and the like any more - just like FS counterparts but with a bit more useful data in it. The software also prints out the flight plan that goes to ATC but I won't show this here - it's pretty much identical to the plan you fill in on IVAO.
4 Weight and Balance, Speeds and Distances
For the AOC or IFR pilot it doesn't end there. A further requirement is to fill in a Weight and Balance schedule. Even though I used the Aztec privately it was an AOC (charter) aircraft so I had to fill these things in even for local flights.
Fortunately the planning software does some of this difficult work for you which you can then transpose to the "official" CAA form. The Performance page looks like this (again click for full size):
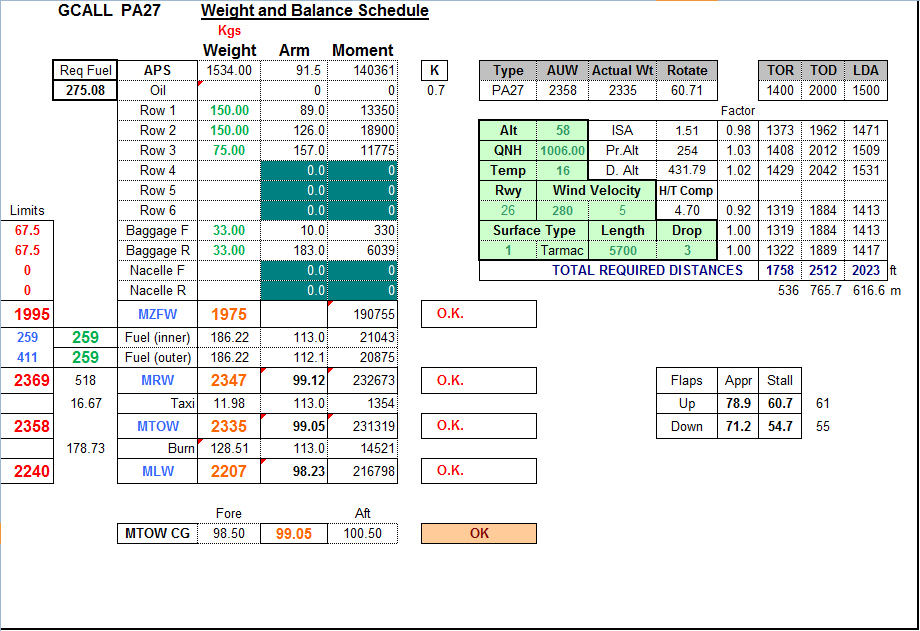
Don't be too worried by this mass of data - it's quite simple really.
<g>
The chart does four things. It works out your weights, it works out the balance, it gives take off and landing distances and it calculates the approach speeds.
Top left we have the fuel required from the plog. Next to this is the table of weights for the different stations - fuel, baggage etc. The arms are taken from the aircraft's weighing schedule. Moments are weight x arm. We don't really need to look at these at all.
In this case the aircraft APS weight is 1534kg. APS is "Aircraft Prepared for Service" and this is the actual empty weight of the aircraft plus oil and unusable fuel. In Row 1 we had two people, Row 2 also had two and Row 3 just one. There was 33kg of baggage in front and rear lockers but none in the nacelles (this only applies to the PA31 Chieftain).
MZFW (Max Zero Fuel Weight) was 1975kg which is below the 1995kg limit so it flags up OK.
We had 518 litres of fuel on board - 259 litres of fuel in both inner and outer tanks. Max for inners is 259 litres and max for outers is 411 litres. Total fuel capacity is 670 litres and with a burn of 100 lph it gives us 6.7 hours endurance. The fuel is well in excess of the 275 litres required but we tend to fly with 75% tank capacity as standard. Luckily the Aztec is a good load carrier and even with this amount of fuel it can carry a full six passengers without fear of exceeding weight limits.
MRW
(Maximum Ramp Weight) was 2347kg and that was under the limit of 2369
so again it flags OK.
Deduct
taxi fuel to get MTOW (Max Take Off Weight) of 2335kg and again
this is under the 2358kg limit so another nice OK flag.
Finally we deduct flight fuel (which is taxi, en route and the 10% margin)
to get the MLW (Max Landing Weight) of 2207kg - again below the
limit of 2240kg and another OK tick.
We
don't have to look at arms and moments as it is all automatic. The total
MTOW moment is divided by the MTOW weight to get the C of G - in this
case 99.05 and within limits.
To
the right of the chart is Field Performance. I won't go into the maths
of this but as you can see it is based on actual weight and runway conditions.
With the values shown the take off run of the Aztec is 536m - not bad
considering we had 75% fuel and five POB. If the temperature had been
+5C the distance would have dropped to 478m. It's not just weight and
wind that are critical values - temperature and pressure also have a major
impact on performance.
Finally
the chart shows the approach and stall speeds for the given weight - not
a great difference as we were near max. Approach speed was 79kts flaps
up and 71kts flaps down - but we don't go below 80kts as that is blue
line speed. Lose an engine below 80kts and you wouldn't recover - the
aircraft would just roll over into the deck.
Unfortunately the CAA don't accept this presentation despite it being perfectly clear. They require a proper AOC Trimsheet format and so we transpose the values onto their paperwork too. It looks like this:
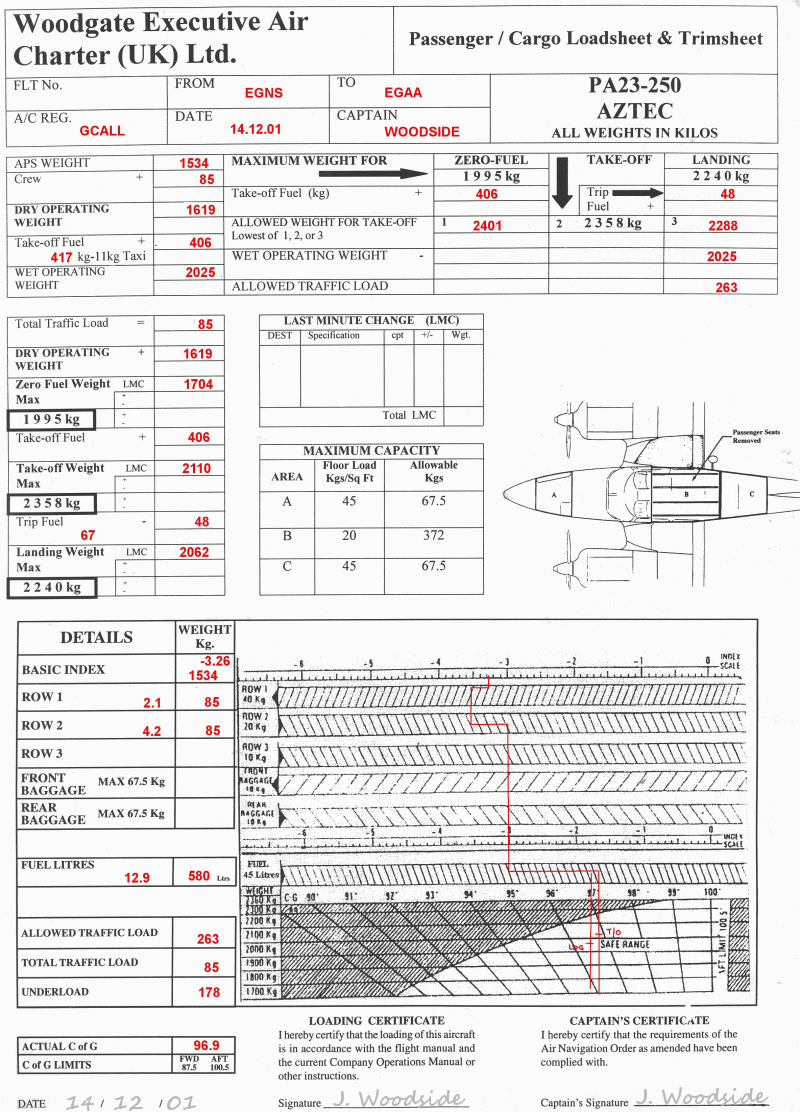
Some of you may have seen this type of chart before - they are required
for all Public Transport operations. Airlines call then Load Sheets and
here is a slightly more complex one for a CRJ:
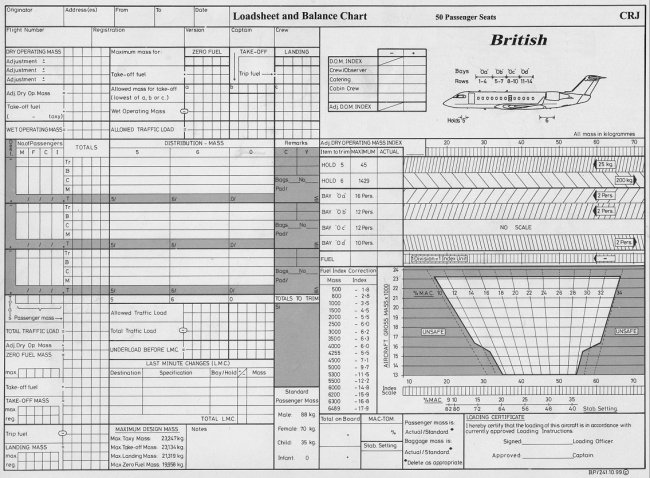
And that's it. We have the paperwork done, we know all our figures for
the flight and we can lead the passengers out to the aircraft.
For the airlines it is a bit easier. The plog is generated automatically
from a big computer in San Francisco (for most airlines) and the Loadsheet
is filled in by Ops. Once the crew get the Loadsheet they set up the weights
in the FMS and it works out the field lengths and speeds automatically.
It's no fun at all..