


FS2004 - Basics of Aircraft Design
Designing Aircraft for FS2004
There's an adage in aviation which runs "If it looks nice it'll fly nice". Nothing could be further from the truth with FS2004 and it's earlier editions. In fact, building an FS aircraft is not an easy process and it gets harder with each new release.
Almost anyone can design presentable scenery for FS - they only have to download a scenery designer and the rest is just a matter of accurate research, time and effort. When it comes to aircraft design you need more than a capable design package, you must also learn the basics of aerodynamics or else a beautiful looking aircraft can end up with all the flying qualities of a drunken pig.
Many people start to design an aircraft without any real idea of what is involved. The usual routine is to begin with the visual model as it's the most exciting bit and it can be very satisfying seeing your creation slowly grow. Once this hurdle is out of the way it can come as a surprise that there are quite a few more stages yet to be tackled - and it is here that enthusiasm must be maintained, or at least replaced by dogged determination.
On this page I am not going to run through the whole creation process in exacting detail - it would take a small booklet to do that - but I would like to show what is involved so that potential designers see the workload ahead.
The Grand Design
If you are serious about building an aircraft let's look at the stages in its construction. There are five altogether.
|
Design Stage |
Description |
Tools required |
|
Visual Model |
This is the physical aircraft design as made in GMax or FSDS. The process of building the aircraft may also involve a need to animate parts and to design a Virtual Cockpit. |
GMax
or FSDS. |
|
Panel |
Most good aircraft now have custom panels. This process may also involve a need to design custom gauges. |
Panel
Builder. |
|
Textures |
Textures are applied to the finished model to create surface colours and detail. |
A
good paint program like PSP. |
|
Sound |
Engine sounds for minimal realism. Additional cockpit sounds for added effect. |
No known tool. |
|
Performance |
This stage creates the files that produce the flying model for the aircraft. |
FSEdit. |
In designing your own aircraft some of these stages may be omitted. It is an easy matter to "borrow" items in your FS inventory, especially sounds and panels, but there is no escaping the fact that you will have to create a visual model, its textures and a decent performance file.
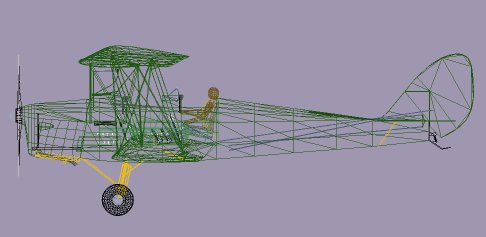
The Visual Model
If you are going to do any aircraft justice then you have to start off by knowing as much as you can about the aircraft. Specifications, photo's, books and plans are all essential before you even think about opening up GMax of FSDS.
Aircraft plans are absolutely essential and the larger the scale the better. If your plans are small scale -1/72 or thereabouts - you will probably have to enlarge them for this work but this compounds drawing errors. It's much better to get plans you need to reduce to fit in GMax as these will give maximum accuracy and detail.
For my Tiger Moth I was using plans scaled at 1/36 and these were big enough to show cowling fastenings, fuel lines, control hinges and other fine detail that is essential when making the model. I am not saying that all these parts have to be built, but knowing where they are helps you to understand more about the real aircraft.
At an absolute minimum you will need top, side and front elevation views of your chosen aircraft. These will not give you all the detail you need (the engine on a DH2 is obscured in all these views) and additional plan detail like rear and bottom views, cross sections, cutaway drawings and enlarged detail are all worth their weight in gold. You can also use photographs to supplement the missing detail but be very careful if you make any parts from photographic sources - it is very hard to estimate correct shape and size.
For my Tiger Moth design the plans were extremely good. As well as standard front, side and top elevations they provided separate drawings for each major component - tailplane, rudder, top and bottom wings, struts, fuselage and propeller. As a result it was easy to make these items without having to interpolate detail form the normal views. For example, the wings on normal 3 view drawings are already set with dihedral, incidence and sweepback and it can be very difficult to work out their true shape from this. It is far easier to build the wing from a "flat" projection and then add dihedral, incidence and sweepback in GMax.
Having collected all your data the production of aircraft parts can begin. Plans can be displayed and correctly scaled in GMax - making life a lot easier - leaving you to concentrate on obtaining accurate shapes of objects.
If new to GMax you will spend as much time in the initial stages fathoming out how the program works as in making aircraft parts. For this reason it is better to start on less complicated structures like the rudder or tailplane than the more ambitious fuselage, wings or landing gear. I say this because you will learn new techniques as work progresses and will realise that existing parts can be made much better. I rebuilt the Tiger fuselage three times during construction and I still see ways I could have improved it.
The Aircraft Panel
Making a panel involves two arts - creating a panel bitmap and filling this with gauges.
For those of us with limited graphic skills the bitmap can be a nightmare. If you have a photograph of the panel it helps in producing an accurate layout but don't think you can use the photo direct in FS2004 - it can take a lot of work to make it look right. Some of the best FS2004 panels look extremely lifelike (like the Dreamfleet Warrior) but they are mostly graphic design work in which the artist has used photos to create the correct ambience of light and shadow.
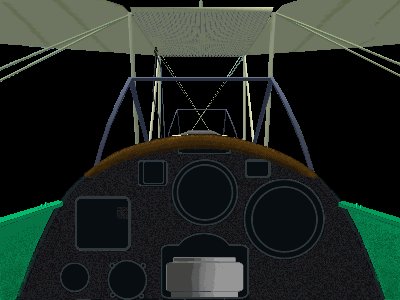
For the Tiger Moth I had no option but to use a full screen bitmap for the panel because the wings had to be included in the view. In monoplanes you see hardly anything of the aircraft looking forward and the panel bitmap can be much smaller - maybe just half the screen height.
The bitmap should be designed with care. It is very easy to get carried away and end up with a huge panel and very little outside view - some of the default FS panels are edging towards this - but a small panel is equally bad in that it increases the area that the outside view has to cover - which has a direct hit on frame rates. For this reason I slightly "modified" the Tiger panel and raised the cockpit sides (they are a good few inches lower on the real aircraft) but in doing so the outside view window only needed to cover three quarters of the screen rather than the whole area.
Having made your bitmap you only have to do two things. First you check that pure black is only used in those areas the outside view is required - if you accidentally use it on the panel itself you will get a hole through which the scenery will show through! Next you work out what gauges you need.
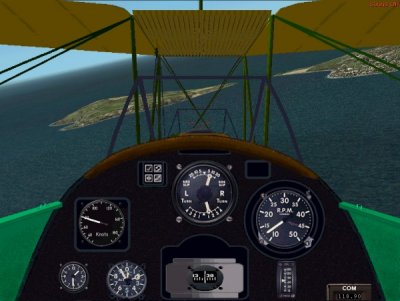
Gauges
Most people take the easy options and use standard FS gauges - or get permission to use a gauge built by another designer. It is quite easy to fit any gauge in your FS Gauges folder on your panel - you can either use a panel maker program for this or copy and edit an existing panel.cfg file. I will not cover this in further detail as many other guides are available for making panels, but the ASI in the Tiger panel.cfg file looks like this:
gauge01=DHasi_kts, 200,508,123,123
The line shows the gauge number (these MUST be sequential in the panel.cfg file), the name of the gauge file, the horizontal offset on the bitmap, the vertical offset and the width and height of the gauge. In this case the ASI is 200 pixels left and 508 pixels down and it is 123 pixels square. The ability to size the gauge is a very handy feature in FS. If the line above was placed in the panel.cfg file of any other FS aircraft the gauge would display.
If you don't find a gauge to suit your requirements then you are going into deeper waters. Designing gauges prior to FS2004 required a knowledge of C++ but the old GAU files are now a thing of the past and from FS2004 onwards gauges are XML coded.
A gauge comprises of a set of bitmaps for the gauge dial, needles, flags or whatever plus the XML code to position these and control their operation. The bitmaps and XML files are usually then placed in a CAB file although this isn't mandatory - but it looks tidier than hundreds of bitmaps and XML files in the Gauges folder..
For the ASI gauge above only two bitmaps were used, one being for the dial face and one for the ASI needle. More complex instruments (like an HSI) require a lot of bitmaps and rather more complex coding.
Aircraft Textures
More painting!
The good news here is that texturing the aircraft isn't as hard as designing the panel. You don't need to consider shading when creating aircraft textures - all you need to do is concentrate on detail. The texture is applied to the aircraft during construction in GMax which is good because it leaves you free to work on the bitmap without constraints at the initial stage. There is just one limitation - the bitmap must be square and it's size must be 256 x256, 512 x 512, 1024 x 1024 or 2048 x 2048.
Try to cram as much data as you can onto your bitmaps - in fact, have a look at the bitmaps for the Corsair in FS2002 as they are excellent both in quality and compactness of detail. Bitmaps are responsible for the huge size of most aircraft downloads in FS2002 and a little thought in the design process can cut these down considerably. A single 1024 x 1024 bitmap in 24 bit colour is over 3Mb..
There are two ways round this. You can either stay with the 8 bit palette and limit yourself to 256 colours - in which case each 512 x 512 bitmap is just 256K (approx). If you want the extra detail offered by FS2004 move up to 24 bit colours and work with 1024 x 1024 images. Each image will be 3072K - but if you then open the image in ImageTool and reformat it as a DXT1 file the size shrinks to just 683K! You may have noticed some DXT1 files already because if you open them in a paint program all you see is a garbled image diffused with vertical black banding. Don't touch DXT files with anything other than ImageTool or DXTbmp.
The easiest way of painting your aircraft is to scan your drawings into PSP and, quite literally, colour them in. Each separate image can then be reduced, copied and pasted into a blank 1024 bitmap and other images added until this is full. Individual items can be rotated if this improves the "fit" - as you can see in the bitmap below.
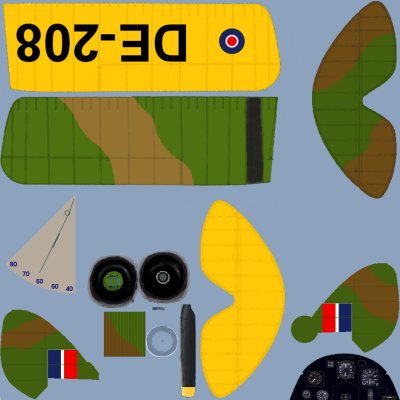
As you can see the scale of individual parts is not an issue and I haven't utilised the bitmap to full potential! On the other hand I used some parts of each bitmap for several aircraft items - part of the yellow wing area was used for some of the struts and the fuselage colouring (not shown on this bitmap) was raided several times for small items like pitot tube and cabane struts.
Sounds
This will be a very short section!
For the Tiger Moth I "borrowed" some sound files from an FS98 version but these behaved strangely to say the least. A look at the sound.cfg file showed that the format in FS2004 is much more complex than for FS98 and this was confirmed by a look at the SDK. I'll admit that I got lost very quickly, although fade in time, fade out time, transition and other effects might be easily understood by those of you who have worked with sound files before.
I opted out and emailed Mike Hambly in the hope that he might take pity on yet another designer who has stepped in a puddle only to find it a flooded mineshaft.. Mike not only responded but provided a new Gipsy Major sound set for FS2004 by return of post. A wonderful gesture from a real gentleman considering I'd never spoken to him before..
Aircraft Performance
The aircraft performance file is the most important part of an aircraft design. It is the ONLY file that "tells" the aircraft how to behave in flight (or even to fly at all) and an aircraft that flies badly is a great disappointment to any FS user - no matter how nice it looks.
There is no interaction between the visual model and the performance file at all. You can make a simple box in GMax - or a boat, cat (tricky), broomstick or pair of boots - and put the MDL into any aircraft folder. Load the aircraft in FS and it's the same old panel that pops up and the aircraft will take off and fly just as it used to - but look at it from the outside and it's a cat or pair of boots that you'll see sailing through the air.
You need two files to create aircraft performance and you may find it confusing because there are some changes in FS2004. As a result it is a hybrid development and you will find some duplication and redundancy. In all previous versions of FS the performance was controlled by values in the .AIR file. In FS2004 many of these values have been moved into the aircraft.cfg file. Unfortunately the .AIR file has not been restructured from FS98 and the same values are still present - but they are redundant.
The .AIR file has to be copied from another aircraft folder because you cannot create one from scratch. It may then be edited with a suitable program like Flight Dynamics Editor or Aired It can be utterly baffling if you've never looked at an AIR file before - and it plunges you right into aerodynamic theory. It is one reason why designers opt out and "borrow" the air file from an aircraft with similar performance. In my case I copied the Sopwith file over to use on the Tiger Moth and modified it as necessary. I only found out later that most of this work was redundant and that FS2004 only utilises a few of the aerodynamic formulae in the AIR file these days.
Most of the data that affects flight dynamics is now contained in the aircraft.cfg file. This is a sensible move and will probably lead to a few new aircraft performance programs emerging. To some extent FSEdit already does this but it's output has been questioned a few times on the design forums. It is certainly good for a "quick" rebuild of any FS98/FS2000 aircraft you port into FS2004. These will still have the minimal aircraft.cfg file required by those programs but if you open this in FSEdit and then save again the additional details are automatically included in the new file.
Again I will not dwell on the aircraft.cfg file too much. If you are serious about creating an aircraft you will find all you need to know in the FSEdit SDK - one of the many now available from Microsoft. It is not light reading.