


FS2004 - VFR Map Reading
Part 2
Theory into Practise
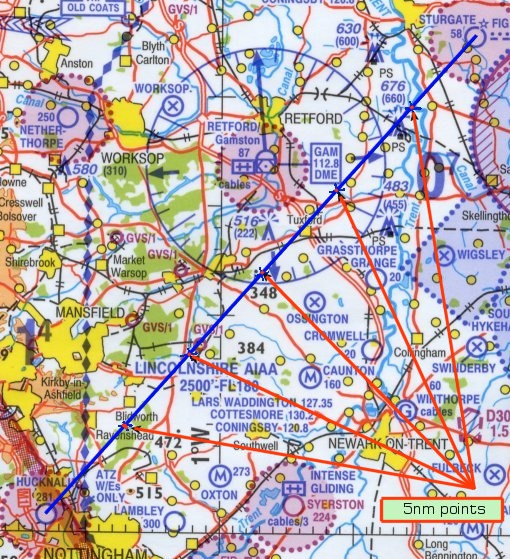
Back at our chopped half mil we can now use some of our newly acquired knowledge to improve our chances of flying to Sturgate. Looking at it again you may see there are some good en route features.
|
CAA
"Half Mil" map reproduced by kind permission. FS users who have not seen a half mil map before should take a little time to absorb the symbols used. Civil airfields are blue circles, military are red. Urban areas are yellow, forest green, high ground deepening shades of brown. In addition to the ground features the map can get cluttered with aeronautical detail but here you will only see a VOR rose at Gamston and small sections of controlled airspace (tinted pink and pale blue). |
Time to go
Any pilot new to map reading will find it much easier if they take off and climb overhead the airfield to their cruising height. This reduces workload as you will not be managing the aircraft and trying to map read at the same time. Set course from directly overhead the airfield and start your stopwatch (or note the time).
I said earlier that the map is marked off in 5nm intervals. There are several reasons for this. By cutting down long legs into shorter sections you can focus on each section in turn and look for just those features for that section - this reduces information overload. It also helps in that if you think you have got lost then you are only 5nm away from your last positive fix - you don't have to go back to the start of the leg again.
Pilot's vary the 5nm rule. Some will use 10nm, some prefer to mark 5 minute intervals and some will just mark significant points en route. 5nm will equate to just 3 to 5 min flying in a light aircraft and may be overkill on a clear day - but if it is hazy it is better than a 10nm point out of sight.
Flying Discipline
Always fly your planned heading as accurately as you possibly can.
This is important because if you don't fly accurately it becomes impossible to assess your true track - and without this you cannot determine a revised heading. If this statement sounds strange then I will pass on another piece of wisdom.
As soon as you set course on any cross country it is almost certain that you will not stay on your planned track. A course correction is almost inevitable - because of slightly incorrect wind forecast, a precessing DI or a wonky compass. For this reason the more accurate you fly a heading - and the sooner you start to relate your position to the map - the quicker you can determine a course adjustment to correct for the error.
The Route
Section 1 - Hucknall to Blidworth. As we leave Hucknall we will see the large area of Nottingham on our right and the smaller spread of Hucknall on our left. These can be taken in with a glance in real life but would require some view switching in FS.
Concentrate on looking ahead in the area before the first 5nm position. The most useful feature is the railway that starts to curve away very slowly to the right of our track. This is helped by the long wooded area through which the railway passes (and might therefore become obscured - keep in mind). The railway will also make sure we don't drift to the right of our intended track - it would be very apparent. At the same time as we see the railway beginning to curve through the wood we should check our left hand side to pick out the town of Ravenshead and look ahead again to spot Blidworth slightly left of the nose.
Section 2 - Sherwood Forest. The next five mile section is heavily obscured by the large Lincolnshire AIAA label plastered on the chart which partly obscures a road and also a disused railway line.
The most obvious feature at the start of this leg would be Mansfield - although 4nm away it would look quite close at 2000ft. Blidworth would certainly be visible on your left but note that the chart shows it as a square rather than showing its true boundary. Beyond Blidworth there is a second town (Rainworth) with Sherwood Forest beyond.
We should pass just to the south of the wooded area if we are on course. A disused railway line crosses our track to the southeast of Rainworth but this may not be conspicuous - the wood is the better feature. Approaching the ten mile point we should be abeam the woodland and should see an active railway line converging from the left and crossing a road and river. Note the red circle with GVS/1 right on our track. This is a Gas Venting Station that we are advised to pass overhead at a minimum of 1000ft.
Section 3 - Ollerton. Onward to the 15nm point looks rather empty on the map but there will be plenty to see on the ground! Keep your scan going for the essential features. There is nothing directly on our track to confirm we are on course but we should easily see the two towns to our left and the railway slowly converging on our course. As we hit the 15nm point the railway will be quite close and, to starboard, we may possibly see a disused airfield at Ossington. We may also see the 516ft mast slightly ahead on our left. Flying at 2000ft the mast would look more insignificant than you might think.
Section 4- Tuxford. This section up to the 20nm point is excellent for features. As we pass over the railway line we should see the A1 ahead quite clearly. Not only that but we should also see a service station to our left, a town and river right on our track and the railway continuing away to our right. This is a very good point for an accurate position fix. Casting our eyes slightly further on the left we might be able to pick out Retford airfield but that would be out of curiosity more than serious navigation. If we are correctly on track we pass just south of Retford's airspace so there would be no requirement to call them - but it might be polite just the same.
Section 5 - River Trent. After passing the A1 you will see that ground features ahead and to our left dry up. On our right however we should begin to see the River Trent converging on our course and we may also spot the multiple masts rising to 676ft AMSL. Notice I continue to use the word maybe - you never know which features are prominent until you fly a route the first time. After that it becomes as familiar as driving down known roads.
Don't get too engrossed in the navigation because you still have other jobs to do! After passing the A1 you only have about 10nm to run to Sturgate and it would be ideal to call them on the radio for landing instructions. It is also time to start thinking about descending - but don't do so prematurely. If you descend too early you see less ground ahead of you and map reading becomes more difficult. Stay at 2000ft until you can see the airfield and, better still, see if they accept overhead joining procedures.
Section 6 - Sturgate. As the Trent begins to cross our track we know we only have five miles to run to Sturgate and we should start a serious scan for it. Grass airfields can be extremely difficult to spot but, if you have stayed on track, you should know which part of the windscreen to look through. As you cross the railway line you are about 2.5 nm from the airfield and should have it in sight. What if you don't?
For a start don't just start wandering around hoping to spot the field. If you do it is a certain way of getting well and truly lost. Notice the town NW of the airfield by about 2nm? If you don't see Sturgate on your first pass turn towards the town. By doing this you'll know two things - your definite position (a great moral booster) and where the airfield is in relation to this position. If you still can't see the airfield then tell the tower - they'll provide some visual clues to assist you (except in FS2004 that is)..
Fly overhead the airfield to the dead side, let down to 1000ft (or specified circuit height), join crosswind, do your checks, look out for other aircraft (of course you've been doing this all along haven't you?), turn final and land. Clear the runway, clean up the aircraft, taxy in, shut down, wait until you hear nothing but the gyro's winding down - now you can start breathing again!! Good fun? Of course it is.
Debrief
If you thought that ATC in FS increased your workload then navigation really piles on the pressure. It is always worse when you first start because you are learning to read the ground for the first time but, with experience, you learn to know what to look for. As experience grows it becomes easier, even fun, and your workload diminishes. If you stick at it you can certainly feel proud that you are one step closer to flying as it is done for real.
Below is a second exercise from East Midlands to Peterborough. I have marked on the map some of the more usable features but you may see that I've deliberately missed others out that would be better. In addition you'll find this route has a higher workload - but can you see why?
|
|
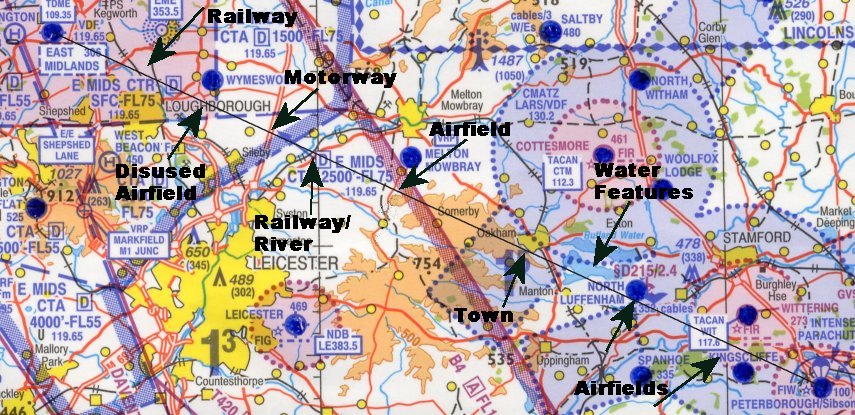
Click map to enlarge
Answers:
The features I have omitted are the large towns of Loughborough and Leicester. This can happen to many pilots who get too focussed on objects directly on track when a huge object such as Leicester is only 3nm away and much more valuable.
Workload will be increased because of controlled airspace and the need for radio discipline. Hucknall to Sturgate could have been flown without any en route radio work (allowing you to concentrate on map reading - and looking out for other aircraft). However, on this route you will have to be with East Midlands Approach until passing their zone boundary, will need to call Cottesmore if you fly through their MATZ (below 3000ft AGL), then Wittering for both MATZ and ATZ crossing. Finally you would call Peterborough.
This flight would therefore be especially busy with both map reading and R/T to contend with.